How To Create a Windows 11 Node for Cisco CML
. This guide walks you through building a QCOW2 ‘golden image' for Windows 11, configuring the installation and updating the necessary drivers plus integrating the node into your CML lab environment.")
Introduction
While Cisco provides the refplat packages which contains a lot of the usual Cisco networking nodes, along with different desktop and linux machines to be used, I often found myself in the need of a Windows machine for testing various environments.
Until CML version 2.9, TPM support/emulation was missing, which is a prerequisite for running Windows 11. Now it’s time to get started!
This guide will cover how to create the baseline node image to be used within your CML installation for Windows 11.
Getting Started
You need to download the following:
- Windows 11 Enterprise ISO - We’ll use the free evaluation version
- Virtio Driver ISO - find the latest version (I used 0.1.271.iso)
- RealVNC Viewer - or any VNC client of your liking
- Windows 11 QEMU Script - Script for initial installation setup
- Windows 11 Node Definition - my own revision which fits this guide
Script Explanation and Variables
Depending on the naming of your Windows 11 ISO and the version of the Virtio driver version, you might need to change the following variables to match your environment - to be found starting from line 5
# === Configurable variables ===
ISO="Win11_24H2_English_x64.iso"
VIRTIO_ISO="virtio-win-0.1.271.iso"
- ISO: Name of your Windows 11 ISO file-image
- Virtio_ISO: As name implies this should match the filename and version of your virtio driver download
The next two lines defines how much RAM and CPUs you’ll be allocating to the Windows 11 installation. You may change these values to speed up the installation or decrease to match your specifications. (Keep in mind this is only for the initial process, later then used as node within CML we can change this)
# === Configurable variables ===
<...omitted...>
MEMORY="8G"
CPUS=4
- MEMORY: Define the allocated amount of RAM to the installation (don’t forget the ‘G’)
- CPUS: Define the allocated amount of vCPUs assigned.
The following variables don’t need to be changed, but I’ll explain some of the stuff - at least you should be aware you can change the naming of the qcow beforehand.
# === no change needed ===
DISK="win11.qcow2"
DISK_SIZE="64G"
TPM_DIR="tpm-win11"
TPM_LOCK_FILE="$TPM_DIR/swtpm.lock"
OVMF_CODE="/usr/share/OVMF/OVMF_CODE_4M.ms.fd"
OVMF_VARS="OVMF_VARS_WIN11.fd"
CPU_FLAGS="Westmere,-waitpkg,-hle,-rtm,-mpx"
- Disk: Name of the disk and .qcow2 image we’ll be creating, can be changed later if needed
- Disk Size: Default the disk size for the Windows partition will be 64G, you cannot change this after the script has been run first time
Rest of the values doesn’t affect anything besides being temporary folders used during installation.
All the lines from 19 -> 46 is setting up the initial environment, disk and emulators for TPM. If they already exist on your system, they’ll be skipped.
The real magic happens starting from line 49 which ultimately starts and spawns the Windows 11 machine using QEMU and passing our previously defined variables into the execution.
# === Launch VM ===
sudo /usr/bin/qemu-system-x86_64 \
-name windows11 \
-machine type=q35,accel=kvm \
-cpu $CPU_FLAGS \
-smp $CPUS \
-m $MEMORY \
-drive if=pflash,format=raw,readonly=on,file="$OVMF_CODE" \
-drive if=pflash,format=raw,file="$OVMF_VARS" \
-drive file="$DISK",format=qcow2,if=none,id=disk0 \
-device virtio-blk-pci,drive=disk0,bootindex=2 \
-drive file="$ISO",media=cdrom,if=none,id=cdrom0 \
-device ide-cd,drive=cdrom0,bootindex=1 \
-drive file="$VIRTIO_ISO",media=cdrom,if=none,id=cdrom1 \
-device ide-cd,drive=cdrom1,bus=ide.1 \
-netdev tap,id=net0,ifname=tap0,script=no,downscript=no \
-device virtio-net-pci,netdev=net0 \
-chardev socket,id=chrtpm,path=$TPM_DIR/swtpm-sock \
-tpmdev emulator,id=tpm0,chardev=chrtpm \
-device tpm-tis,tpmdev=tpm0 \
-serial file:win11-serial.log \
-device qemu-xhci \
-device usb-tablet \
-device qxl-vga,ram_size=134217728,vram_size=67108864,vgamem_mb=64 \
-vnc :1
Transfer the Necessary Files to CML
Copy the files you downloaded earlier onto the CML controller.
I’m already in the folder where my assets are located on my local machine, you might need to change directory first, if you copy my commands directly.
scp -P 1122 w11.sh admin@<IP-or-Hostname>:/home/admin
scp -P 1122 virtio-win-0.1.271.iso admin@<IP-or-Hostname>:/home/admin
scp -P 1122 Win11_24H2_English_x64.iso admin@<IP-or-Hostname>:/home/admin
Unless you’ve changed specific user settings on your setup, you should be able to see the 3 files present within your local home admin directory on the CML controller.
cd /home/admin
admin@cml-controller:$ ls -lh
-rw-r--r-- 1 admin admin 6.7G Jan 10 16:18 Win11_24H2_English_x64.iso
-rw-r--r-- 1 admin admin 148M Jan 10 16:26 virtio-win-0.1.271.iso
-rw-r--r-- 1 admin admin 2.2K Jan 10 16:13 w11.sh
Setup the Windows 11 Machine
In theory we could run this initial Windows 11 installation machine on another server, but we’ll be using the CML controller for this since it already have all the necessary packages installed (QEMU, EFI files etc.)
Suggestion for screen management (SSH)
Use tmux if you don’t plan on waiting for the Windows installation, or you’ll not be finished with the Windows 11 configuration during your current session.
If you disconnect your SSH session while following along, you’ll terminate the temporary VM that is spun up - resulting in your machine being torn down and potentially corrupted meaning you have to start over again with installation, configuration etc.
Therefore I highly suggest using a screen manager like tmux or screen - however, in this article I’ll be hinting the tmux commands which is also the default package installed on the CML controller.
Execute the Windows 11 setup script
Before running the Windows script which will start the machine, create a new tmux session
tmux new -s w11 # This creates a new session named 'w11'
# If you need to reattach to the session (e.g. lost SSH connection to CML)
tmux attach -t w11
Inside this session we’ll be starting the script.
sh w11.sh
If you want to detach yourself from the ‘w11’ tmux session and return to your ‘regular’ screen.
# Press CTRL + b
:detach
For the next step you need to start your VNC client (I’ll be using RealVNC Viewer), in order to connect to the display of your CML Controller.
We will be creating a “local port forwarding”-rule so we can connect to localhost:5901 on our local machine which will when forward and tunnel the connection through to “IP-or-Hostname-of-CML”:5901 which is our CML controller.
ssh -p 1122 -L5901:localhost:5901 admin@IP-or-Hostname
- -p 1122: Default SSH port on CML
- -L5901:localhost:5901: Our local machine’s port 5901 is forwarded to ’localhost:5901’ on the CML host.
- admin@IP-or-Hostname: Username and the CML host.
Once connected through a VNC client we’ll then get ‘display :1’ for our CML controller.
Connect to localhost:5901 through your VNC client.
You’ll most likely be met by a screen saying that there is no operation system installed, and that you failed to press ‘ANY KEY’ in time. (PXE boot failed as well)
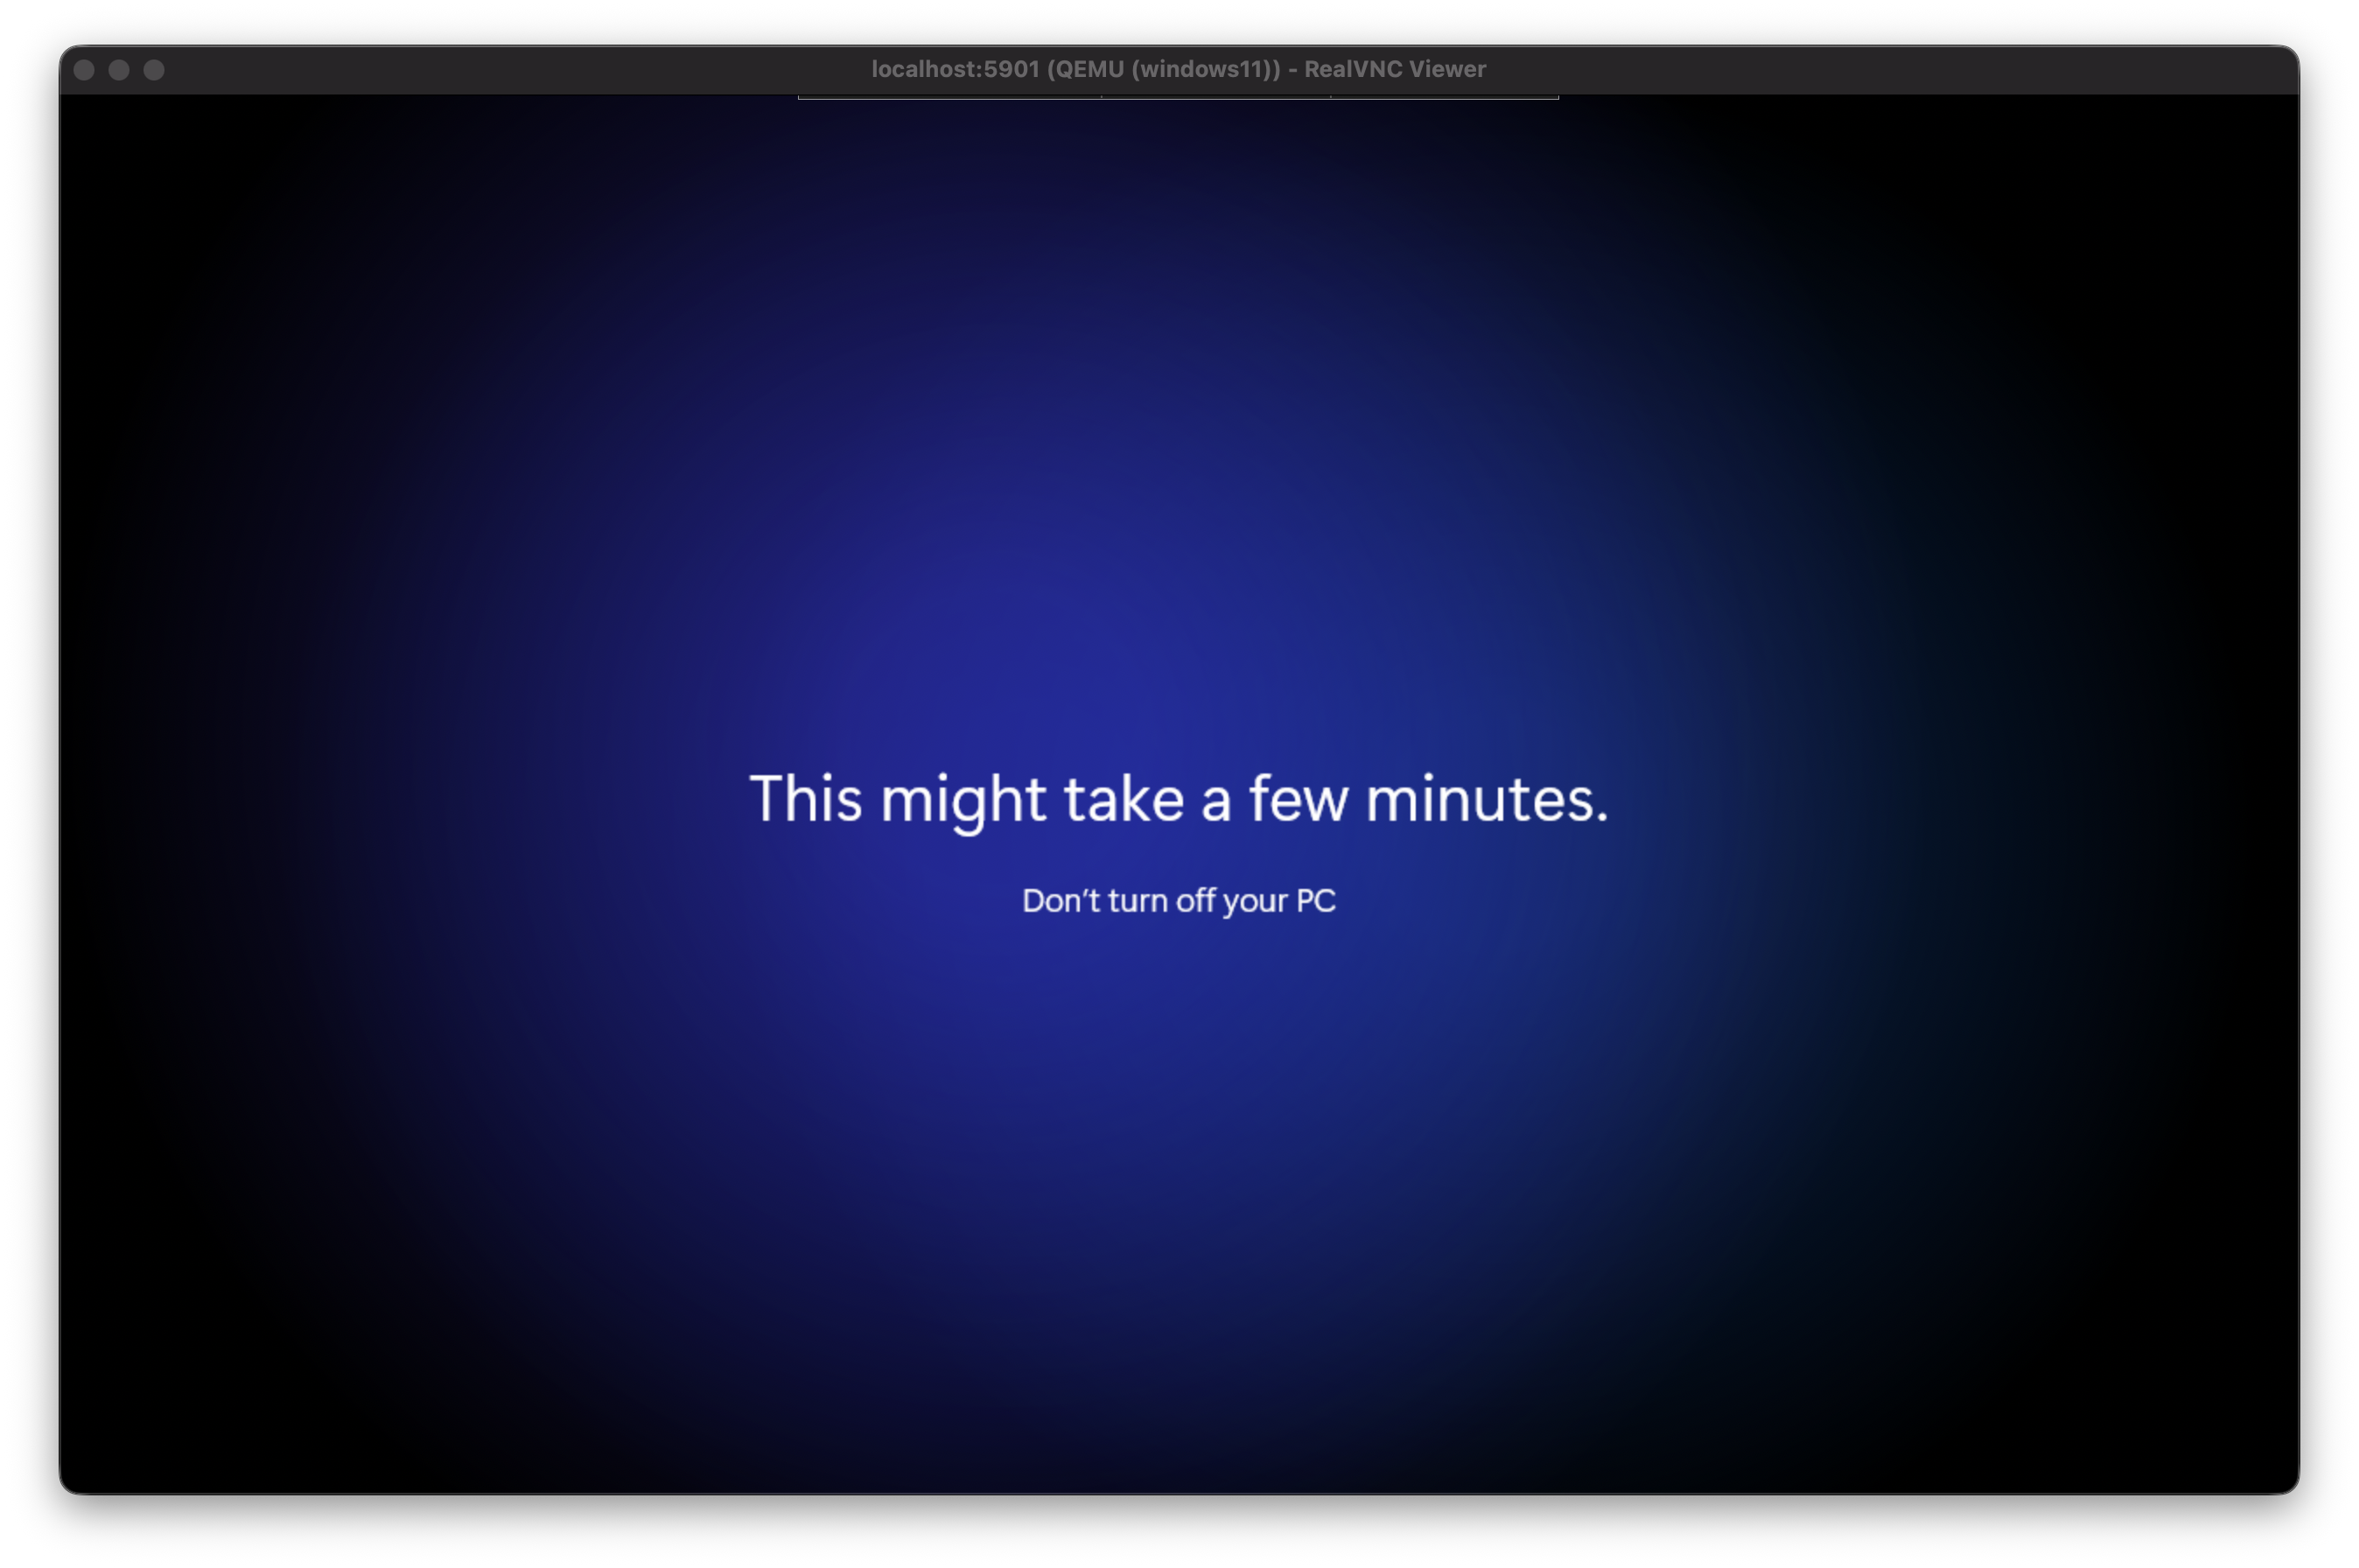
Go ahead and execute an CTRL + ALT + DEL within your VNC program to force a reload of the installation (be sure to press ANY key when prompted again), which will force the system to load the Windows 11 ISO installation image. Depending on your system, this could take several minutes.
(If you end up in the BIOS, just select ‘Restart/Reset’ and system will reboot)
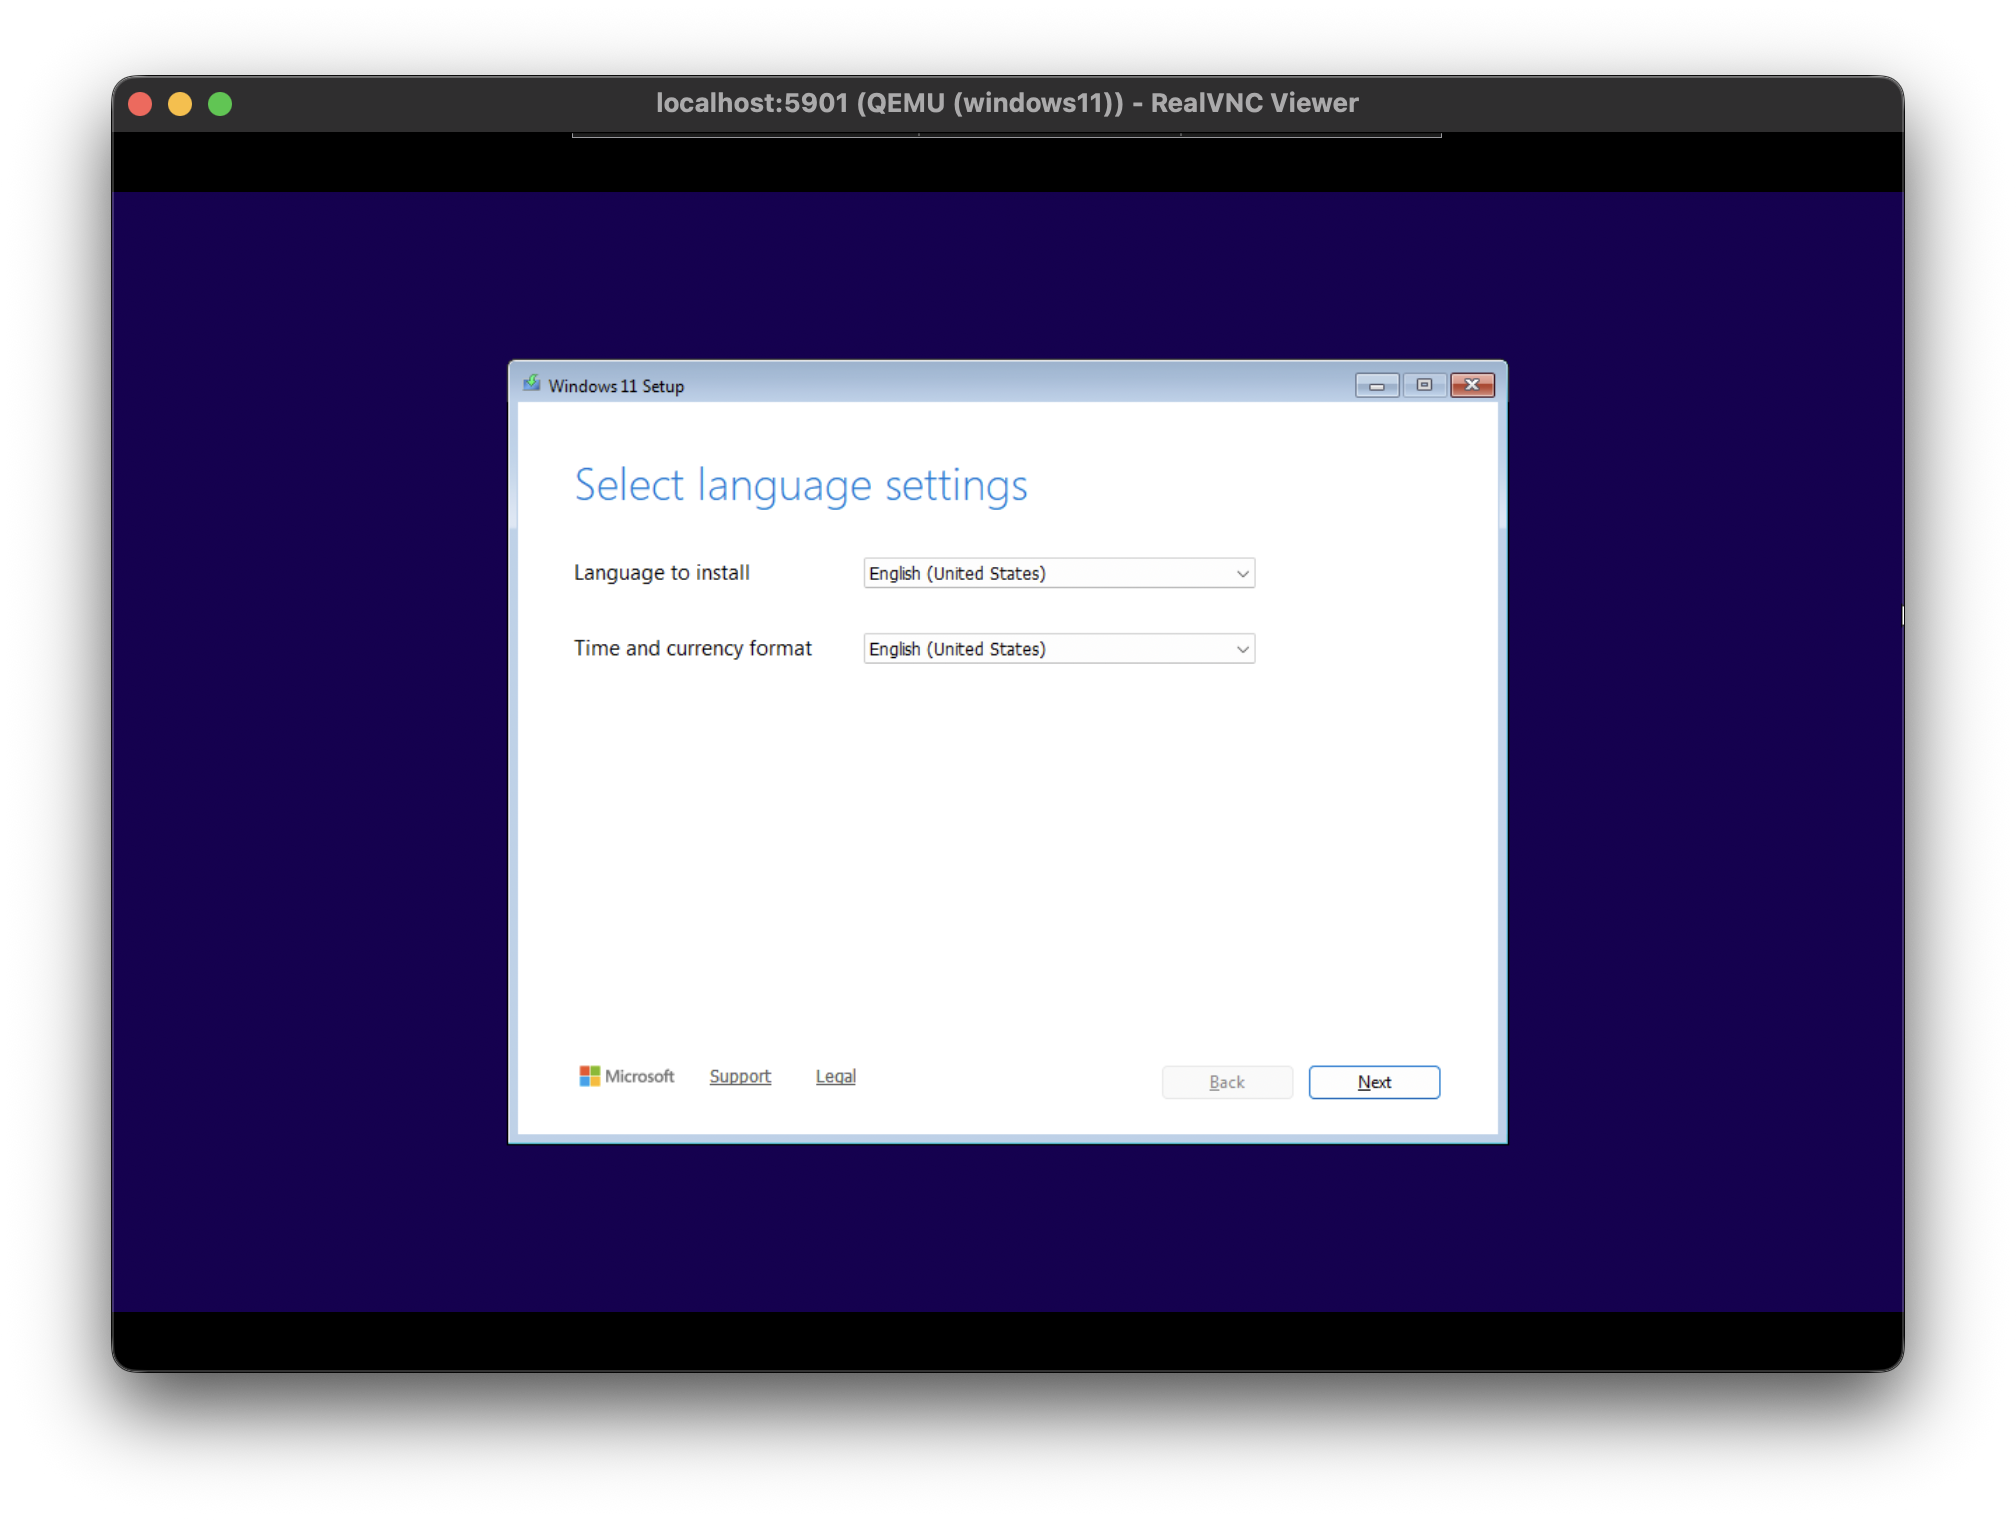
Installing Windows 11
The next couple of screens and steps will be the usual Windows installation process, but a few minor adjustments are required compared to a regular system on a ‘regular’ system.
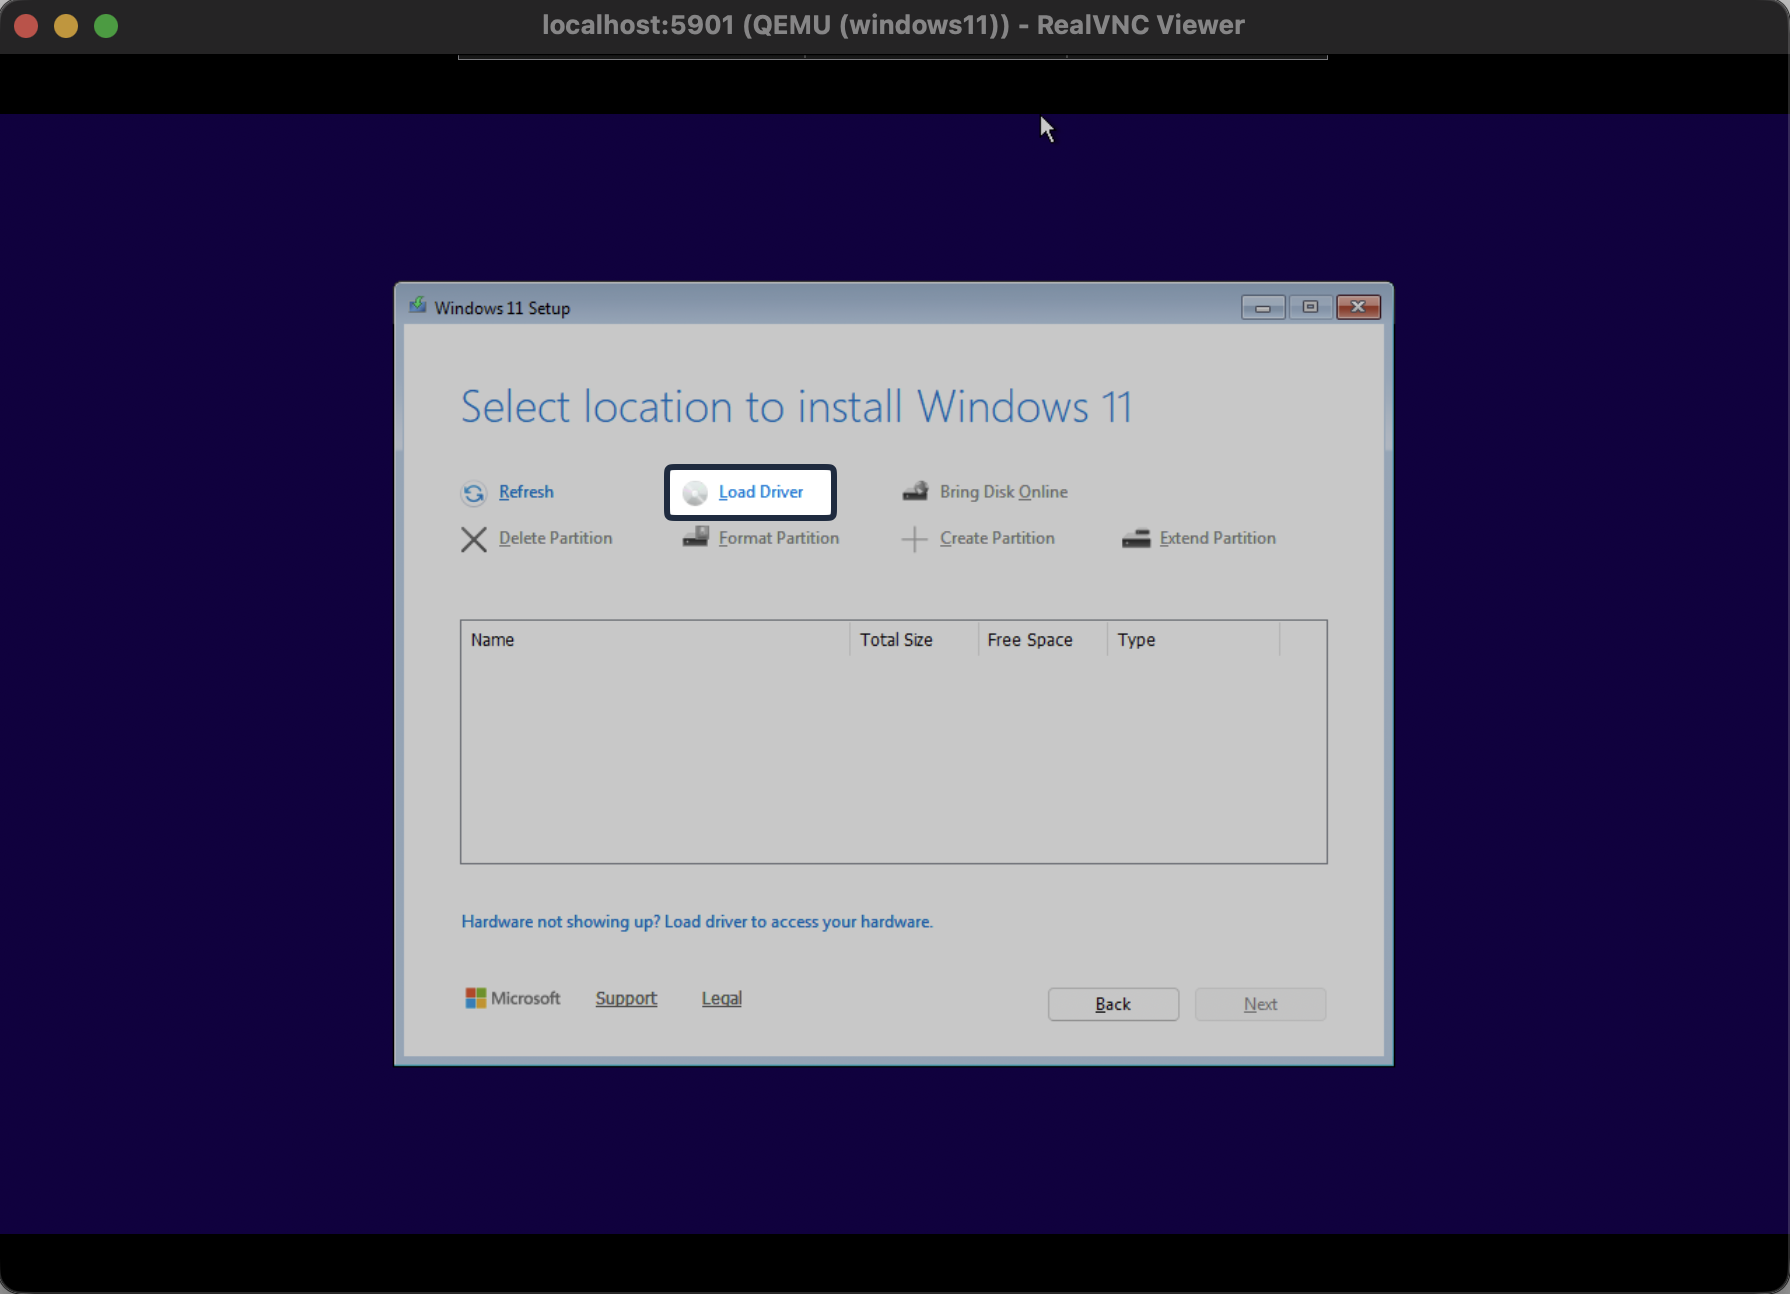
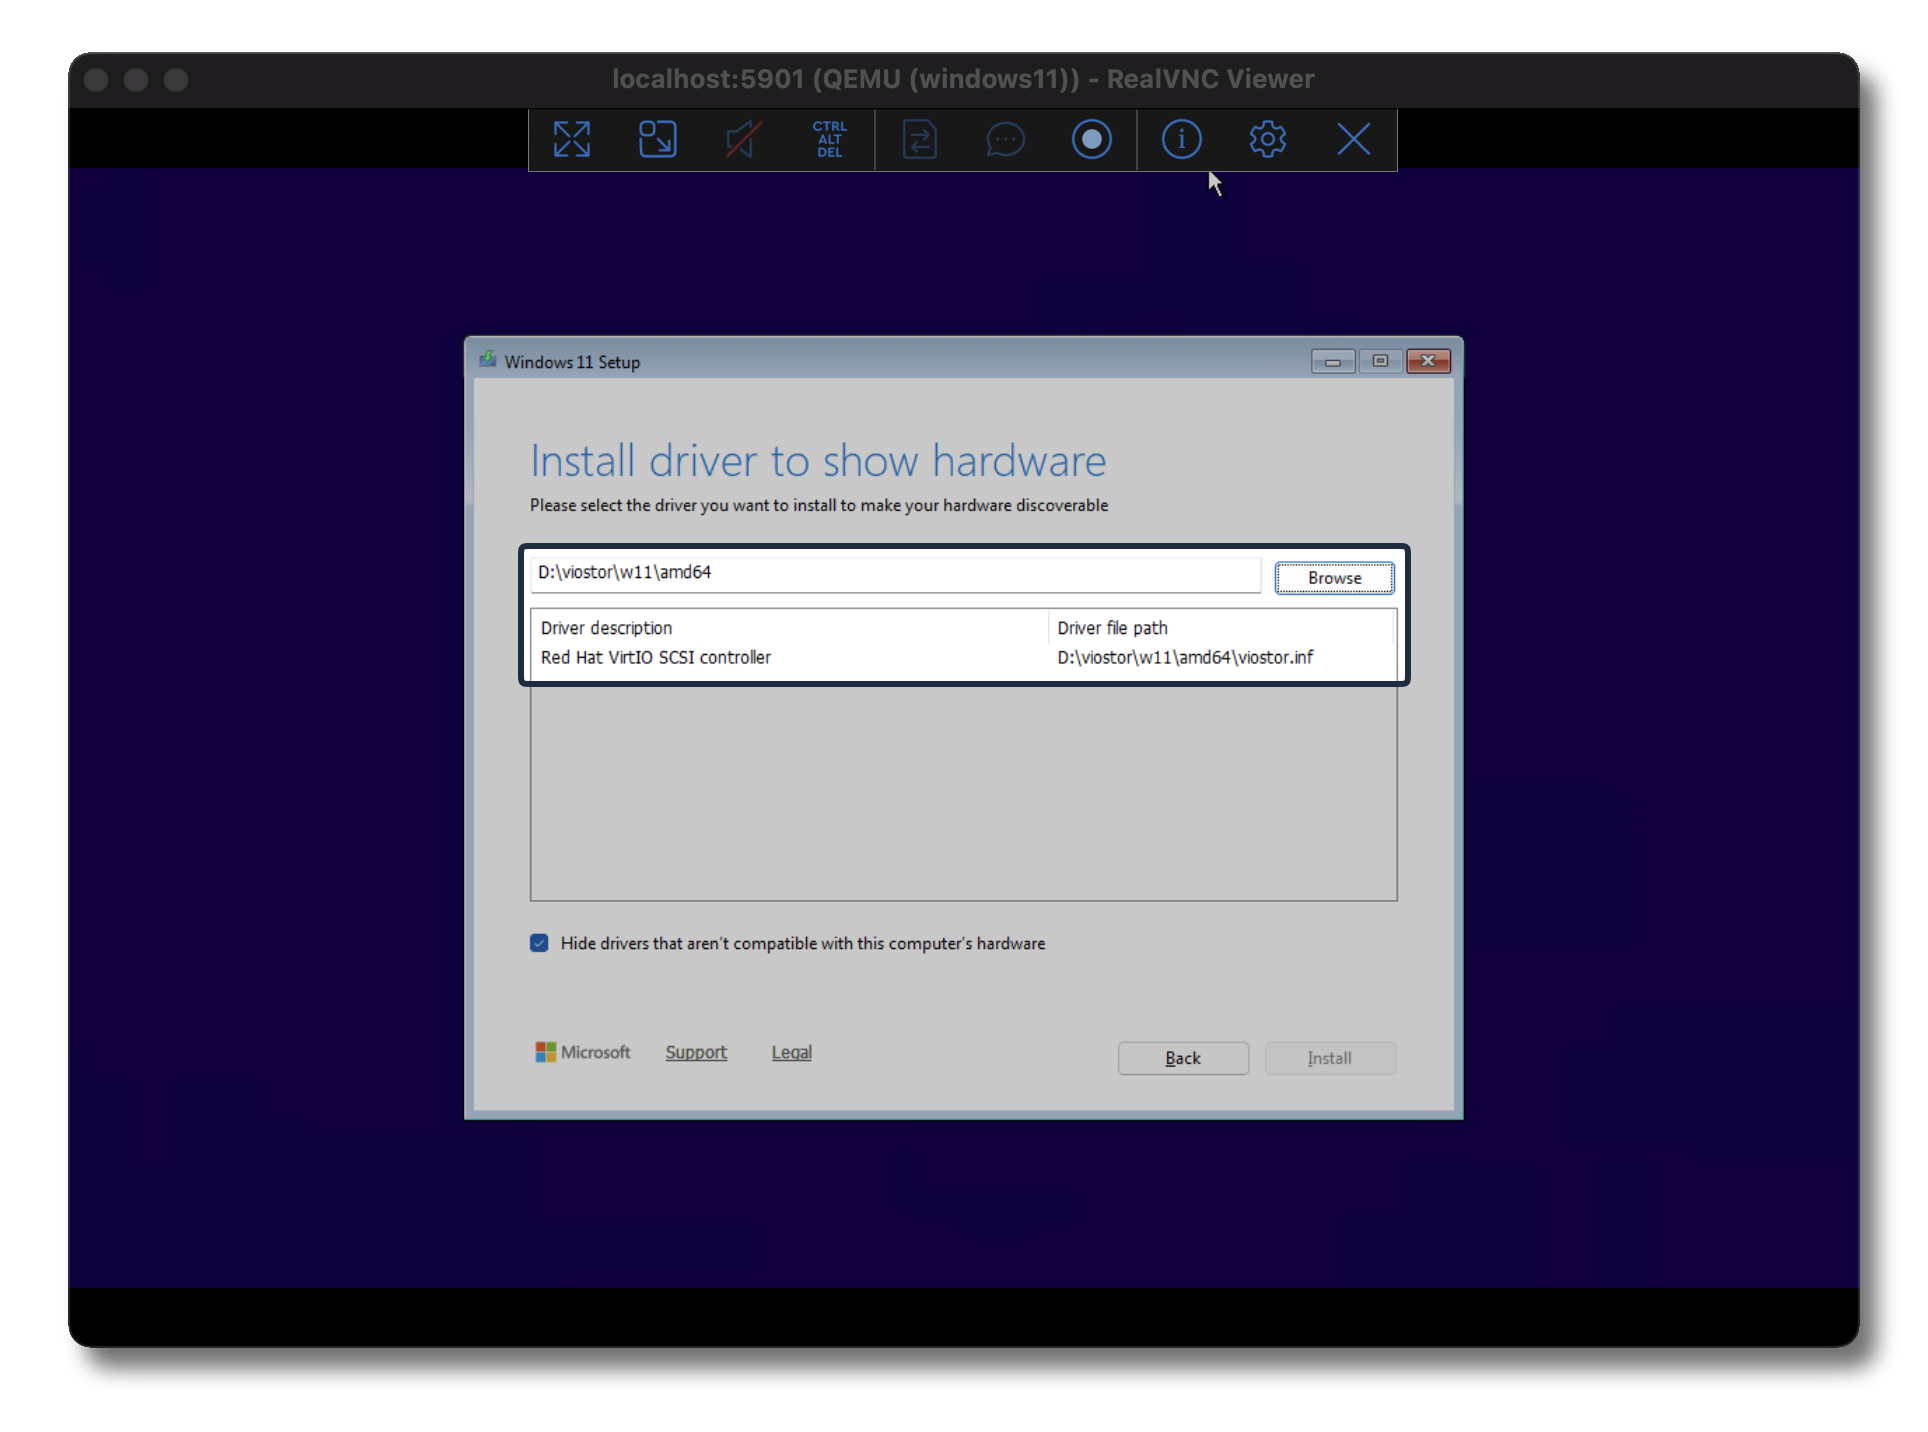
Find the following path
D:\viostor\w11\amd64

Next step is to be patient depending on the resources assigned in the script section, it may take a while - so grab a cup of coffee or get some fresh air in the meantime…
Time flies by…
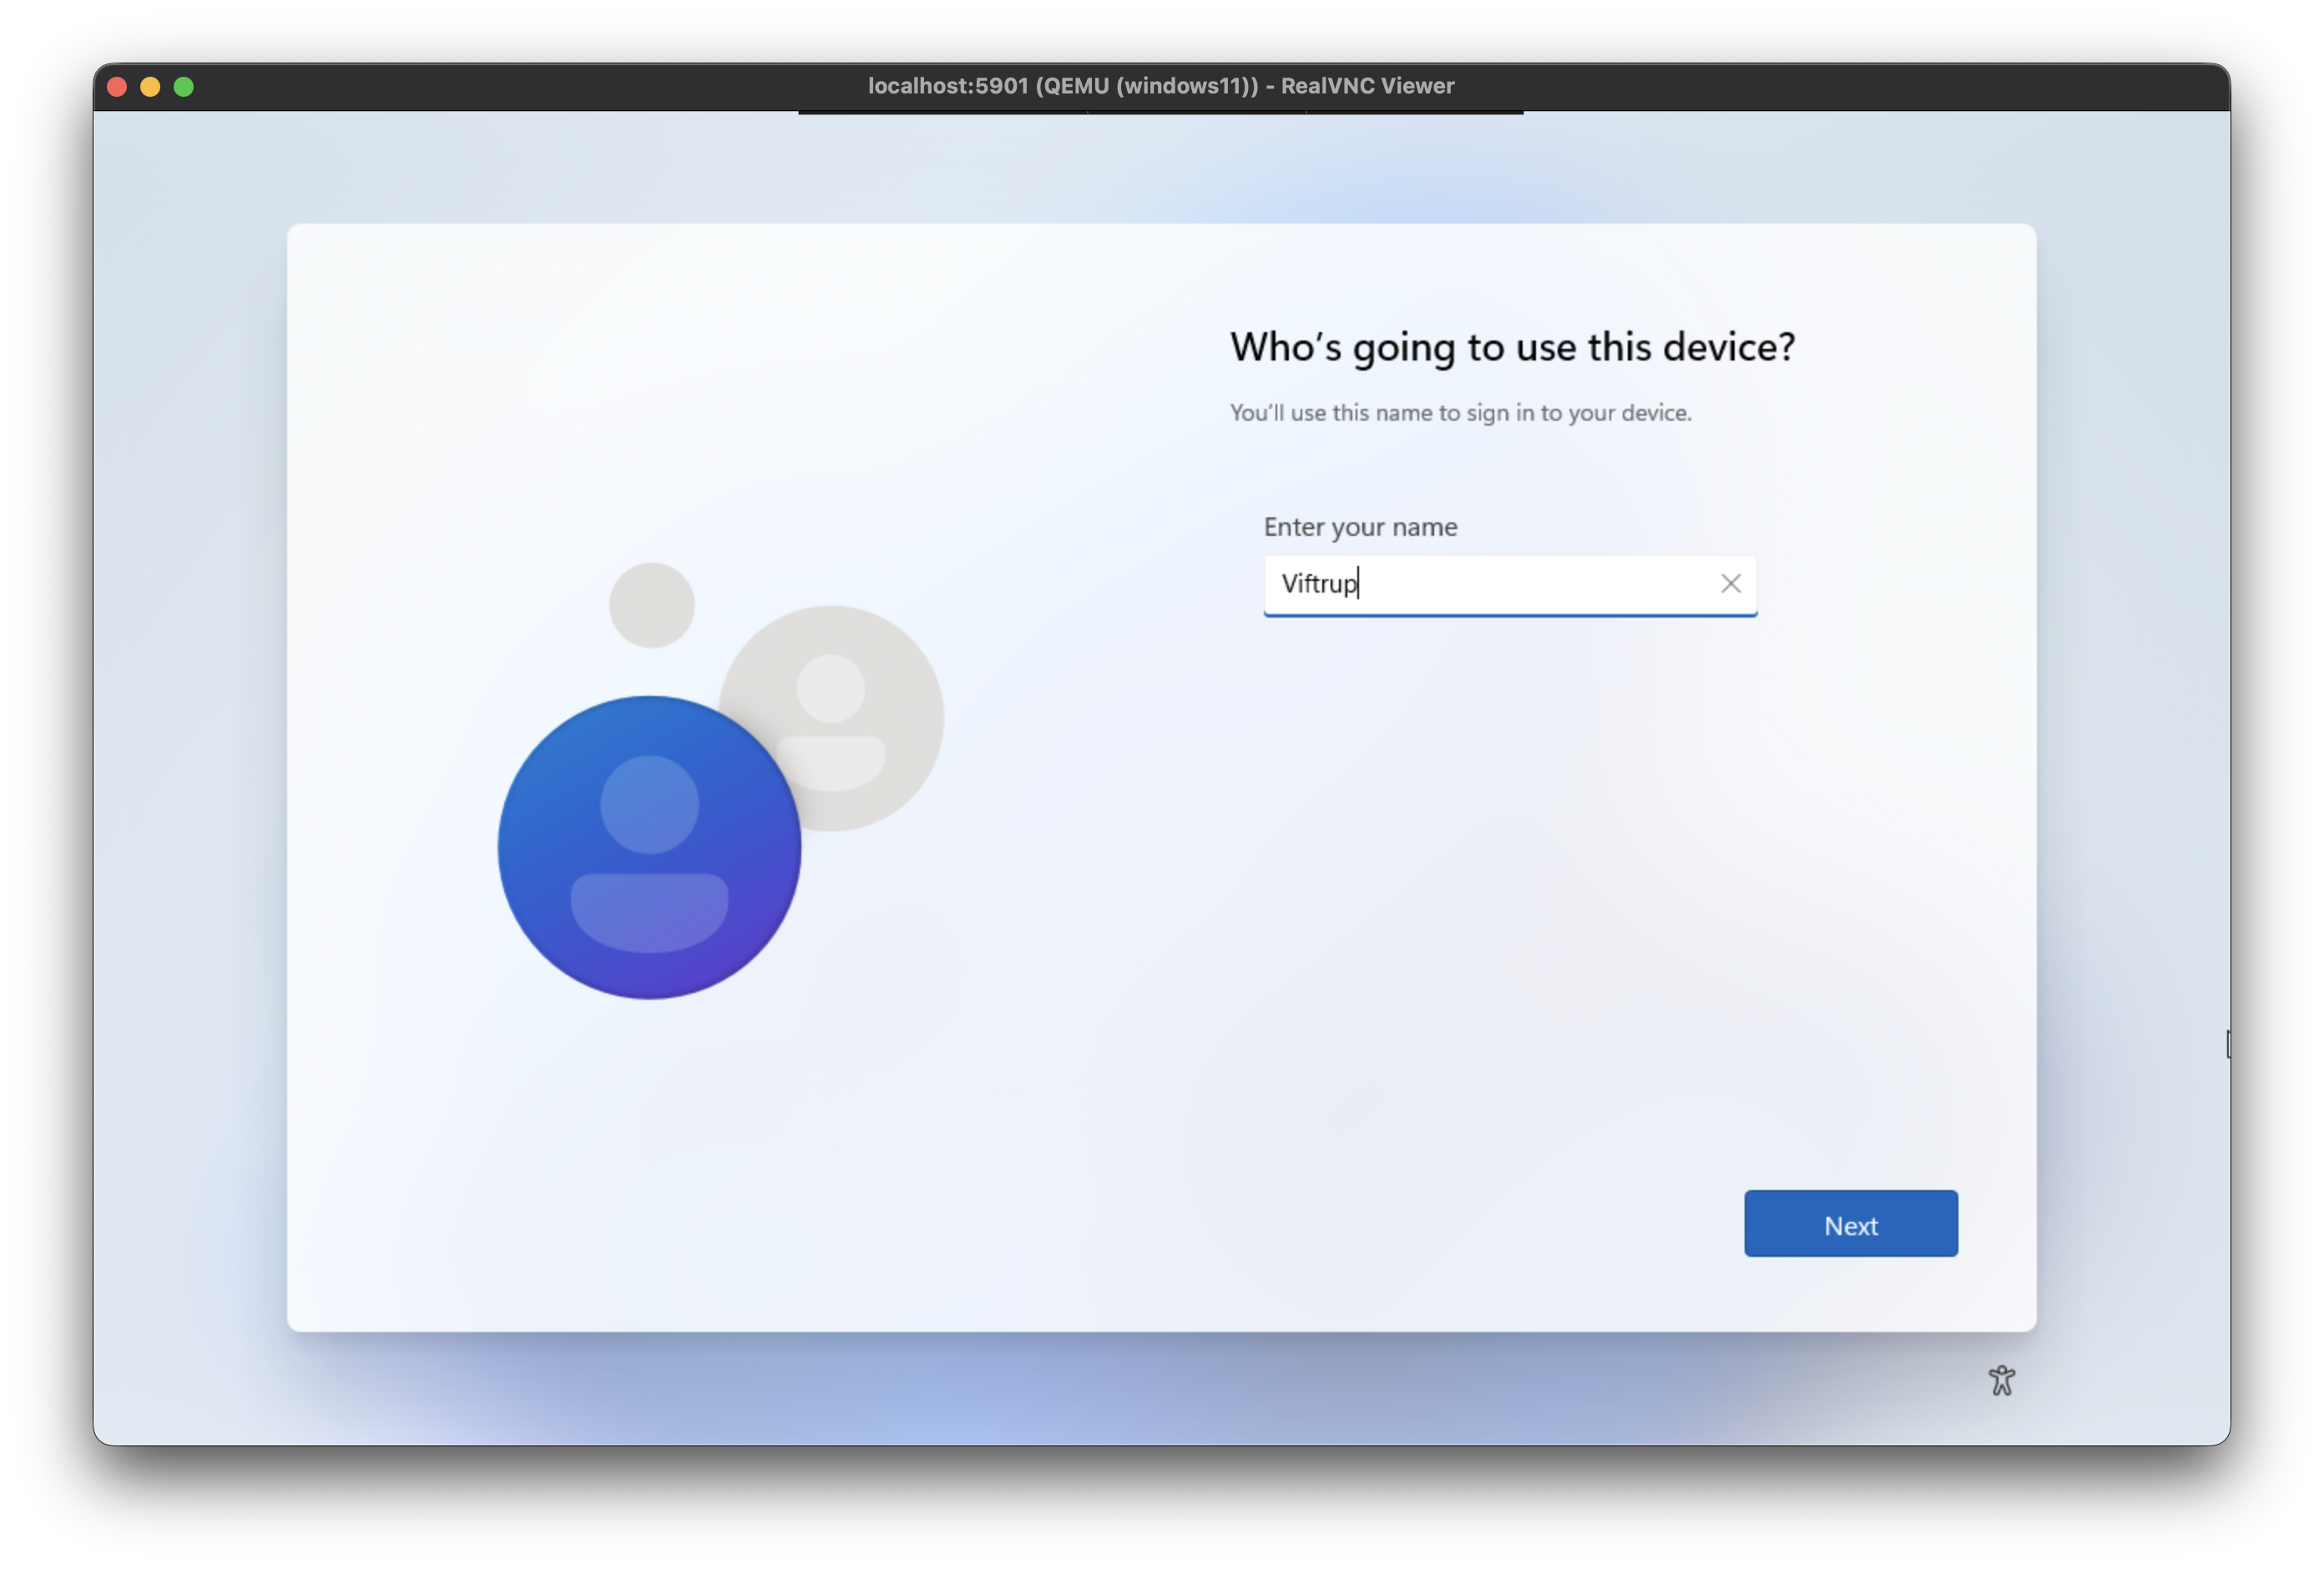
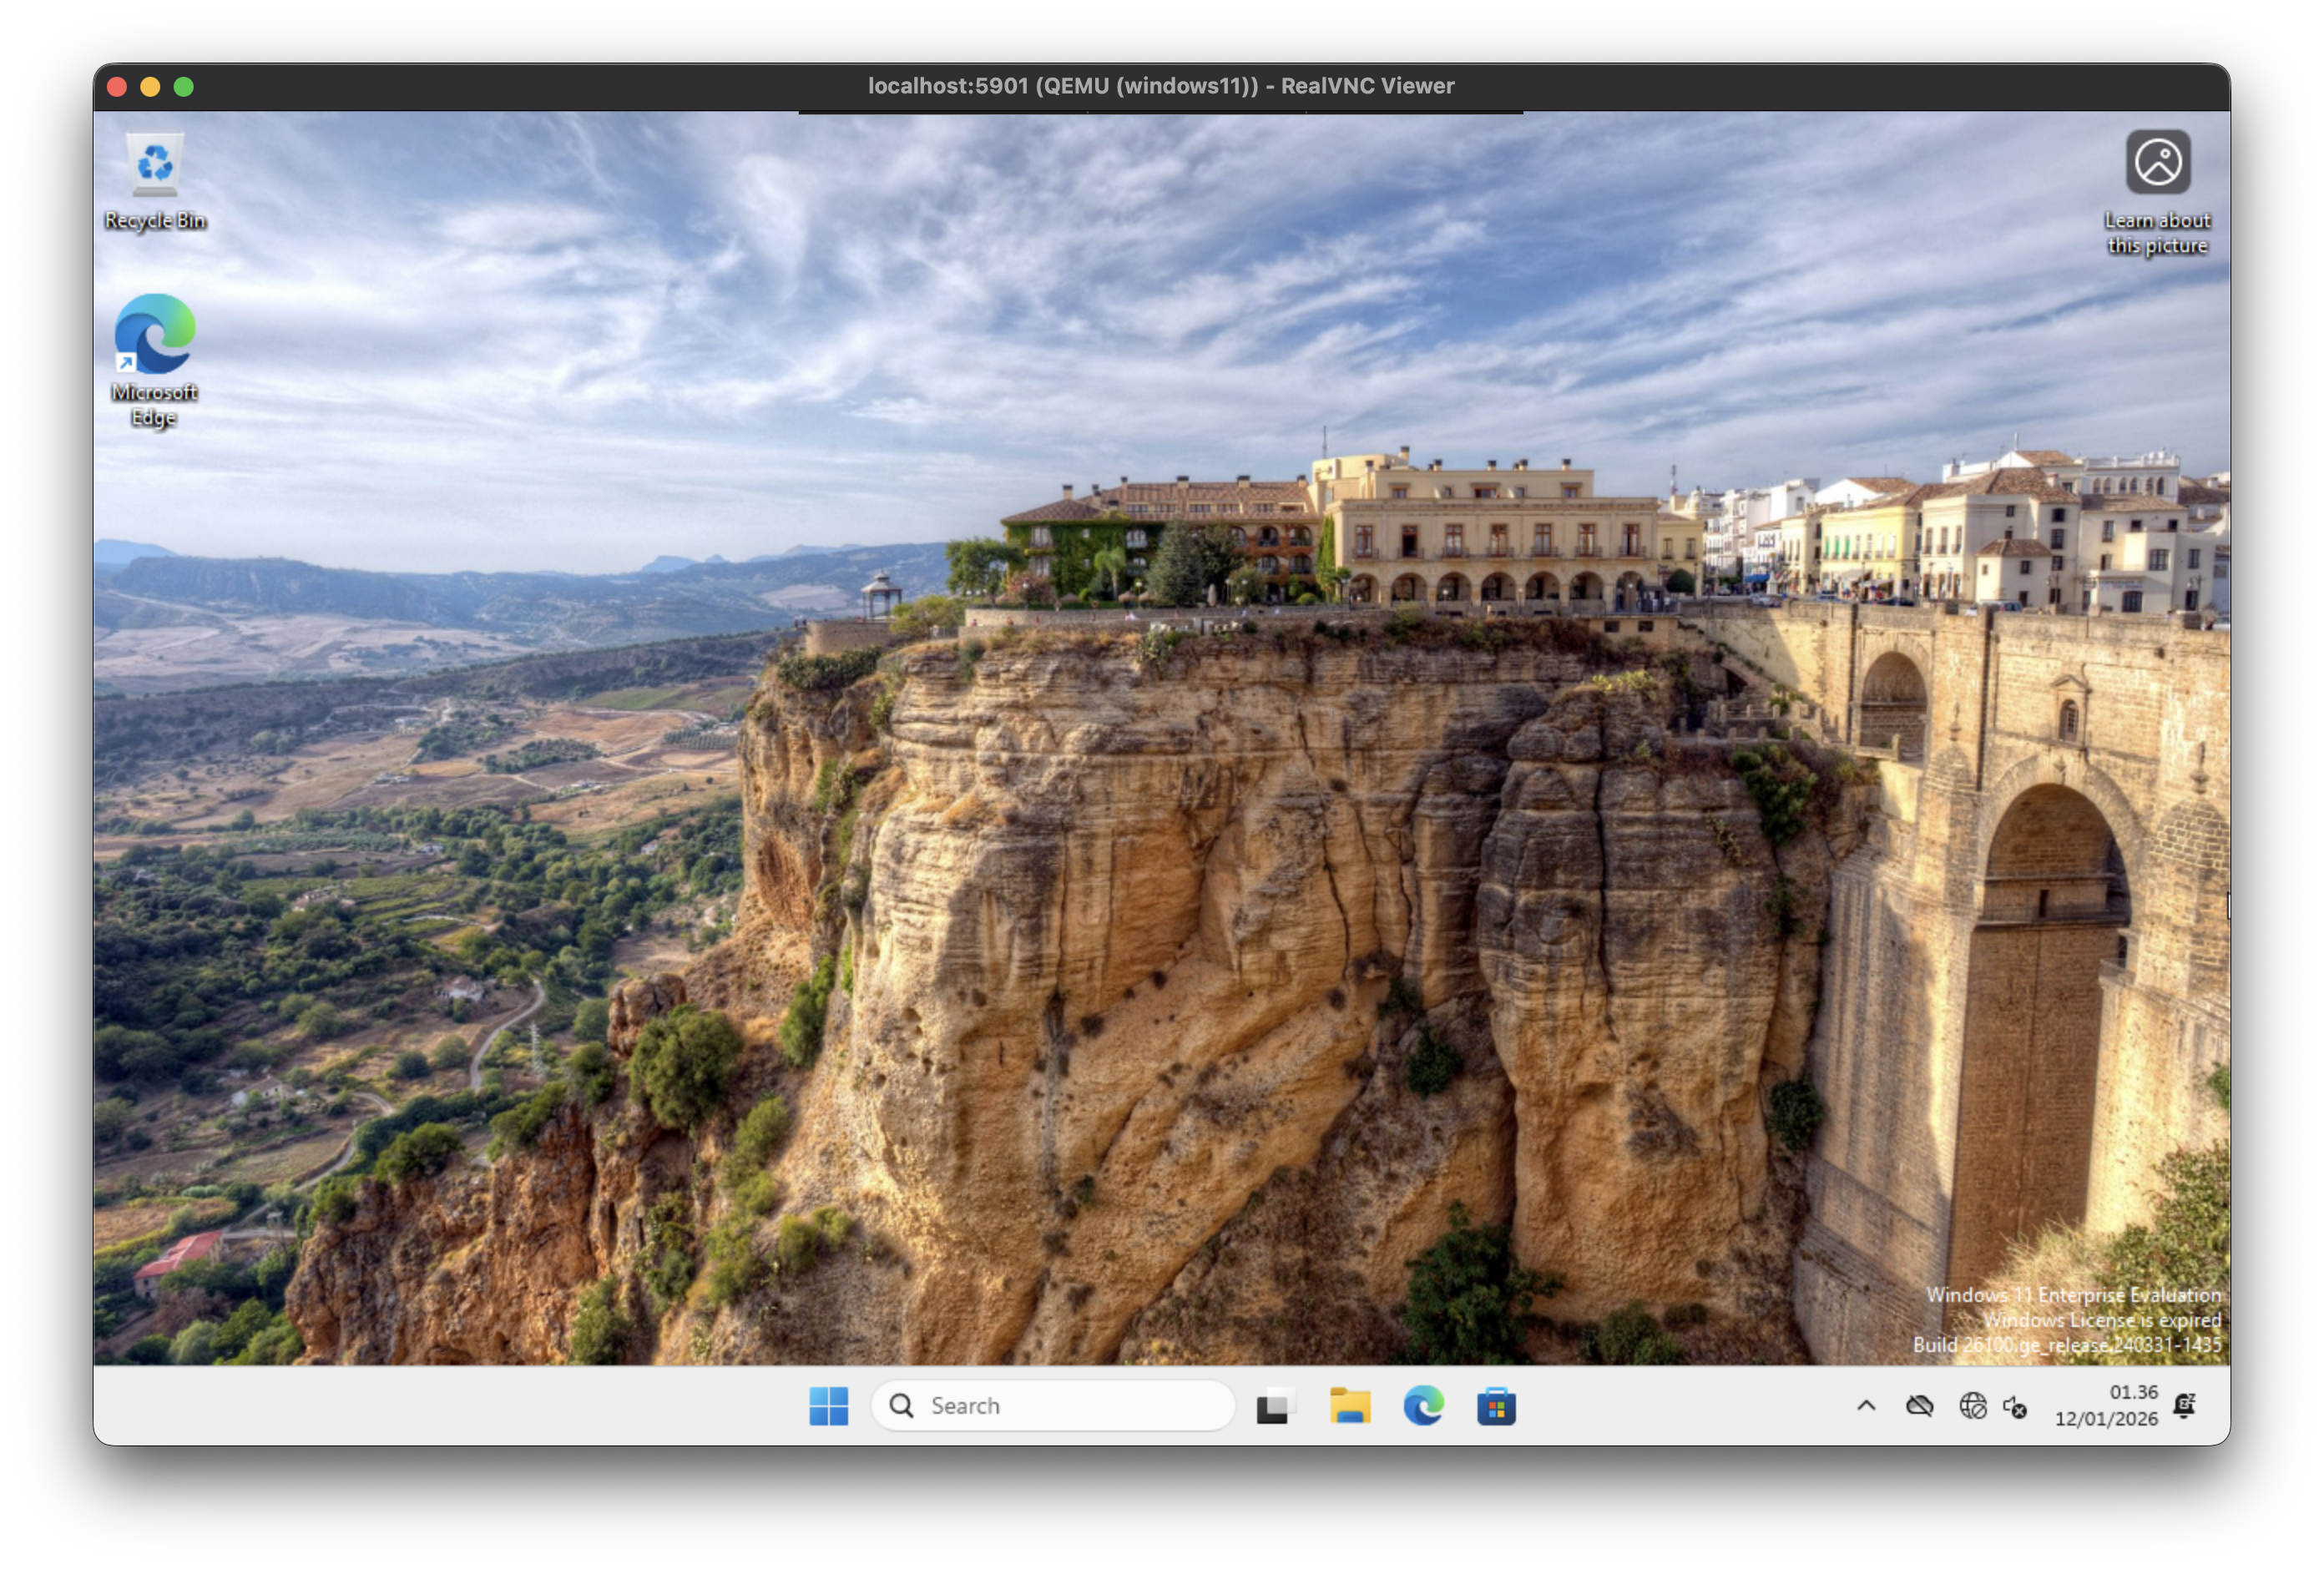
The next couple of steps is pure configuration and might be personalised to your liking, but once installation has finished you should be prompted to provide localisation settings, setting up an user account and additional prompts.
Updating Drivers for Network and Graphics Adapters
The next couple of sections is focused on highly recommended and somewhat mandatory operations in order to have a fully functional and enjoyable experience.
First step is to update the network drivers in order to have a working network adapter, currently at the installation the driver present is not suitable and won’t work.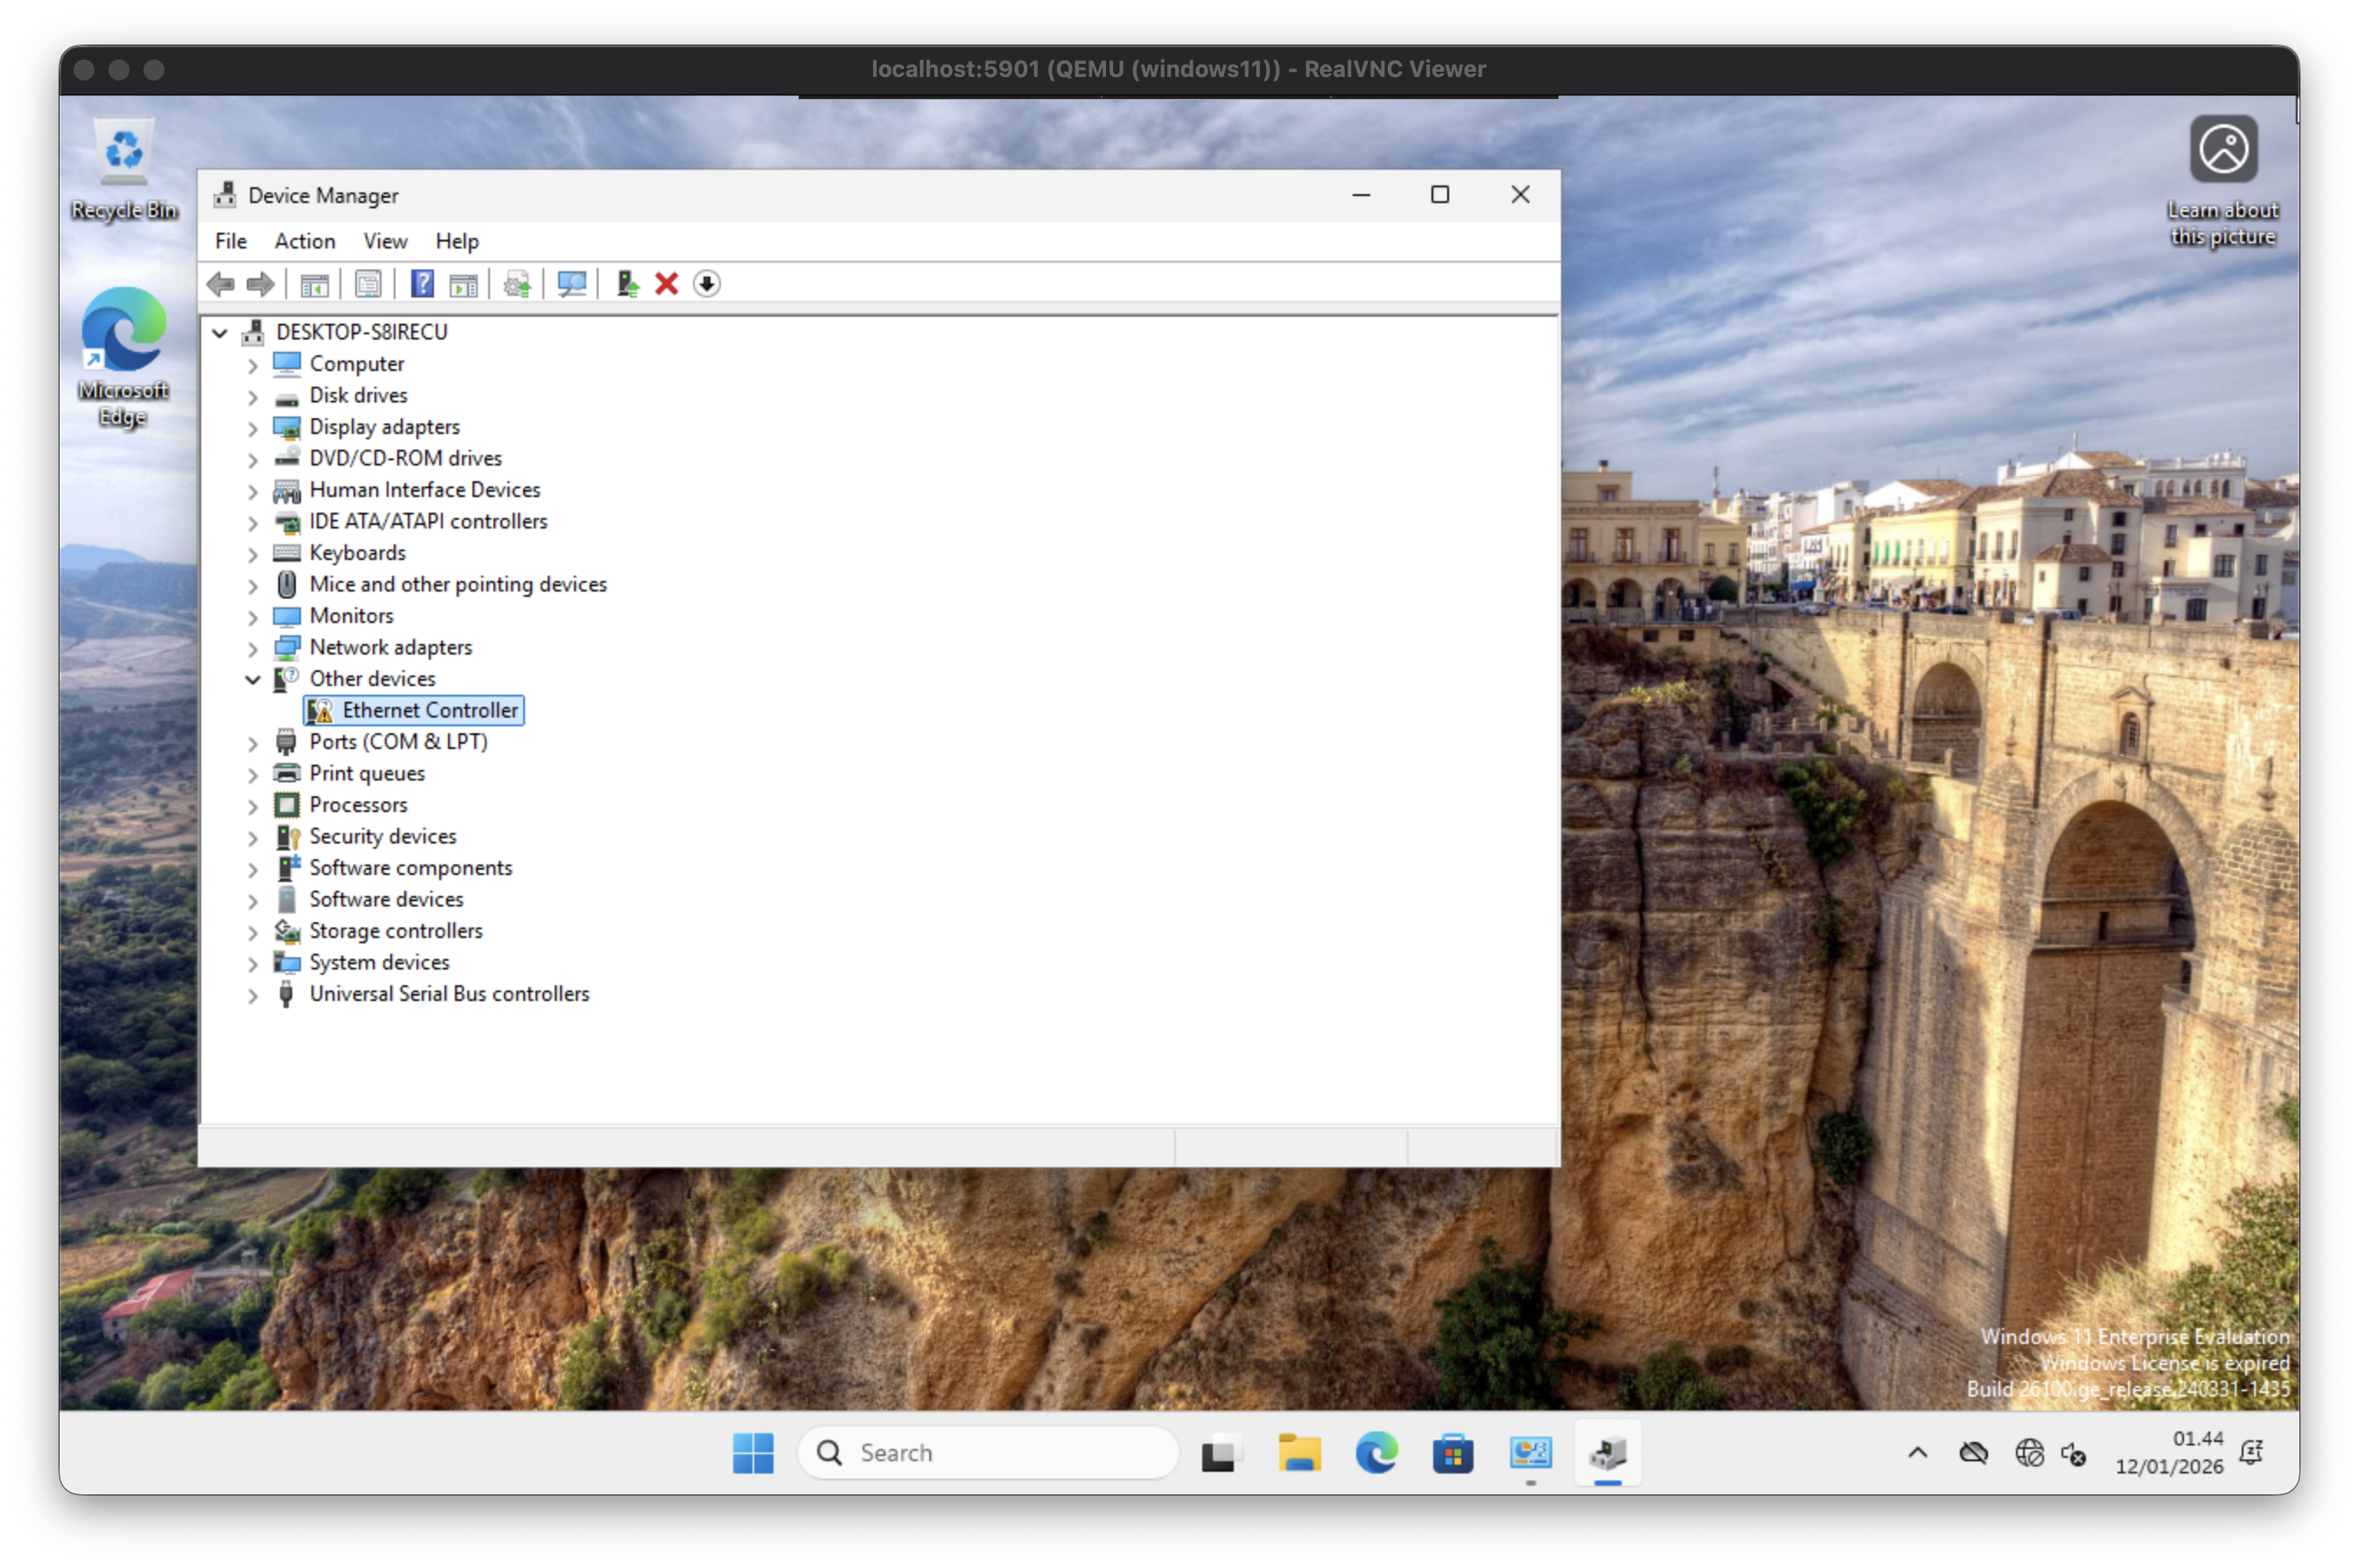
Open the Device Manager > The Ethernet Controller driver needs to be corrected.
Right Click > Update Driver > Browse my computer for drivers > Navigate to
D:\NetKVM\w11\amd64
After the driver installation has succeed you should be seeing the ‘Red Hat VirtIO Ethernet Adapter along with the other ‘WAN Miniport XYZ’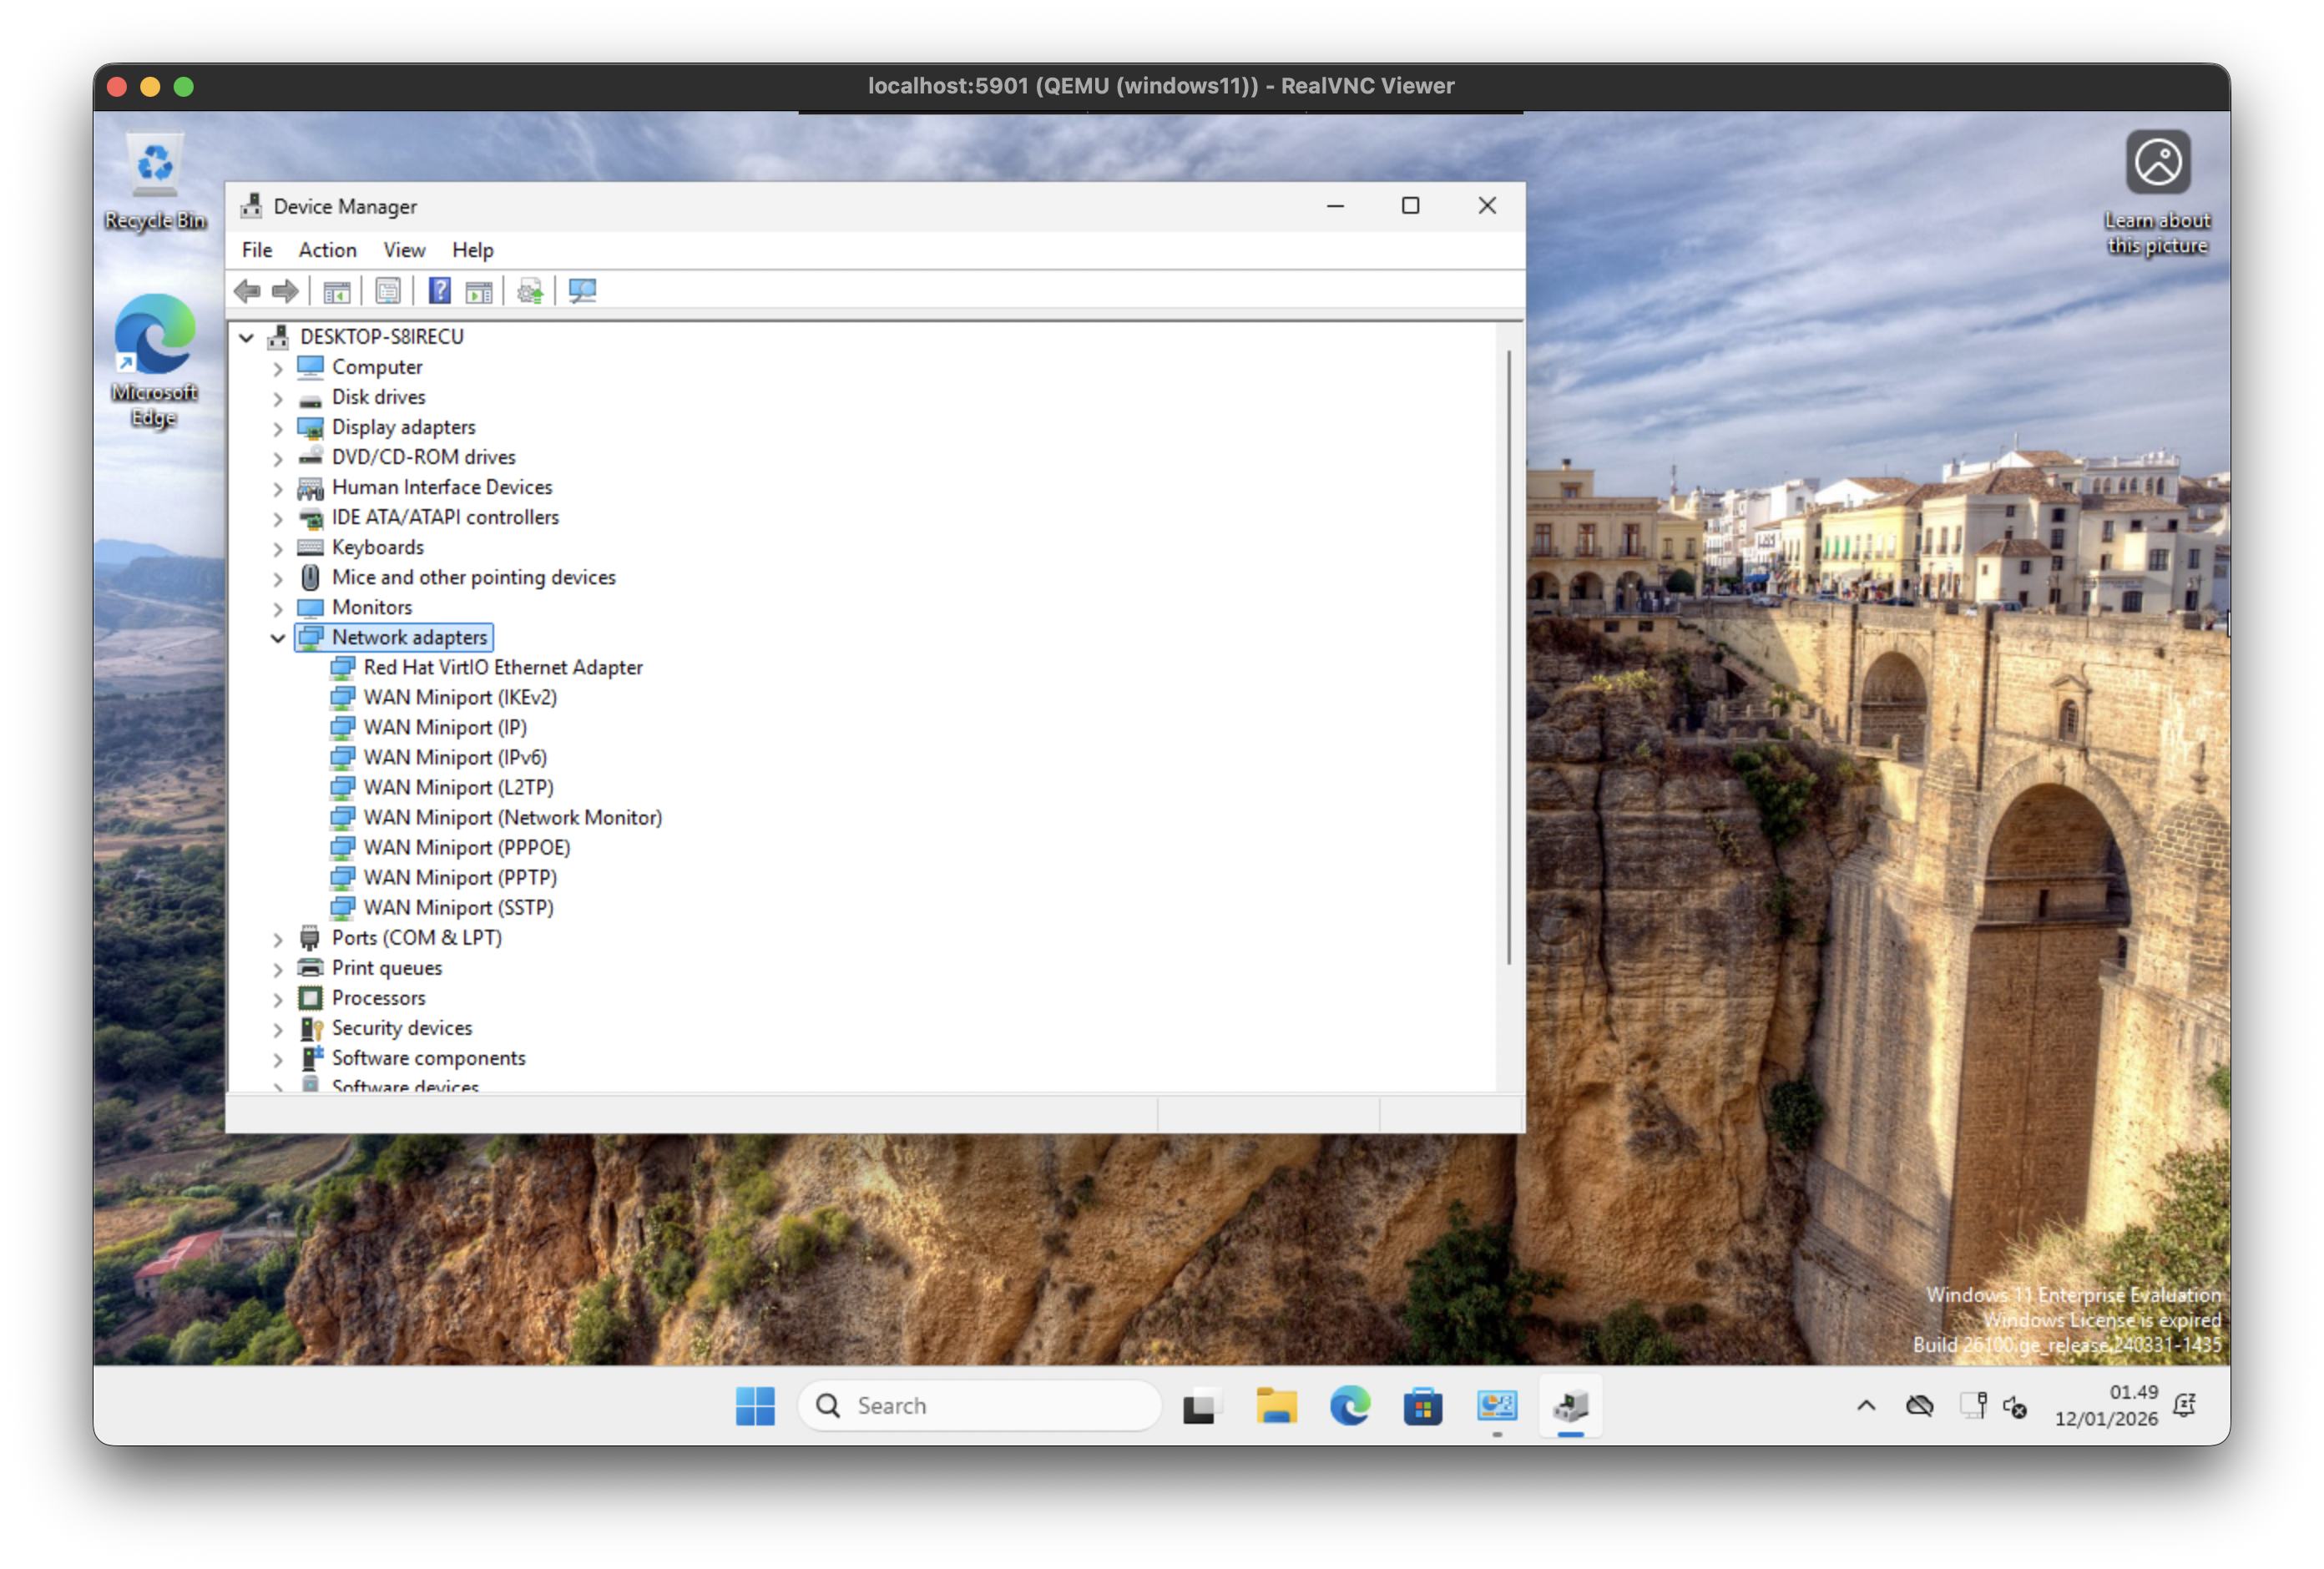
Go to Display Adapters and right-click on the Microsoft Basic Display Adapter and select the option to update driver, as we did in the network section.
This time the path might trick you
D:\qxldod\win10\amd64
(There is no specific driver for win11 in this package, so be sure to select win10 - it works!)
As seen in the Network Adapters section, the name of the adapter should now change and is called Red Hat QXL controller
Disable Windows Updates (highly recommended)
While this is an optional step to take in your setup, I highly recommend disabling Windows Update to make sure your nodes stay intact and no sudden breaking changes.
I’ve also experienced throughout creating this blog and while still prepping my Windows 11 ‘golden image’ installation, that the machine would suddenly start updating and reboot several times.
Start by going to Windows Search or up Run and search for gpedit to enter the Local Group Policy Editor
Head under Computer Configuration > Administrative Templates > Windows Components > Windows Update > Manage end user experience and find the Configure Automatic Updates and select Disabled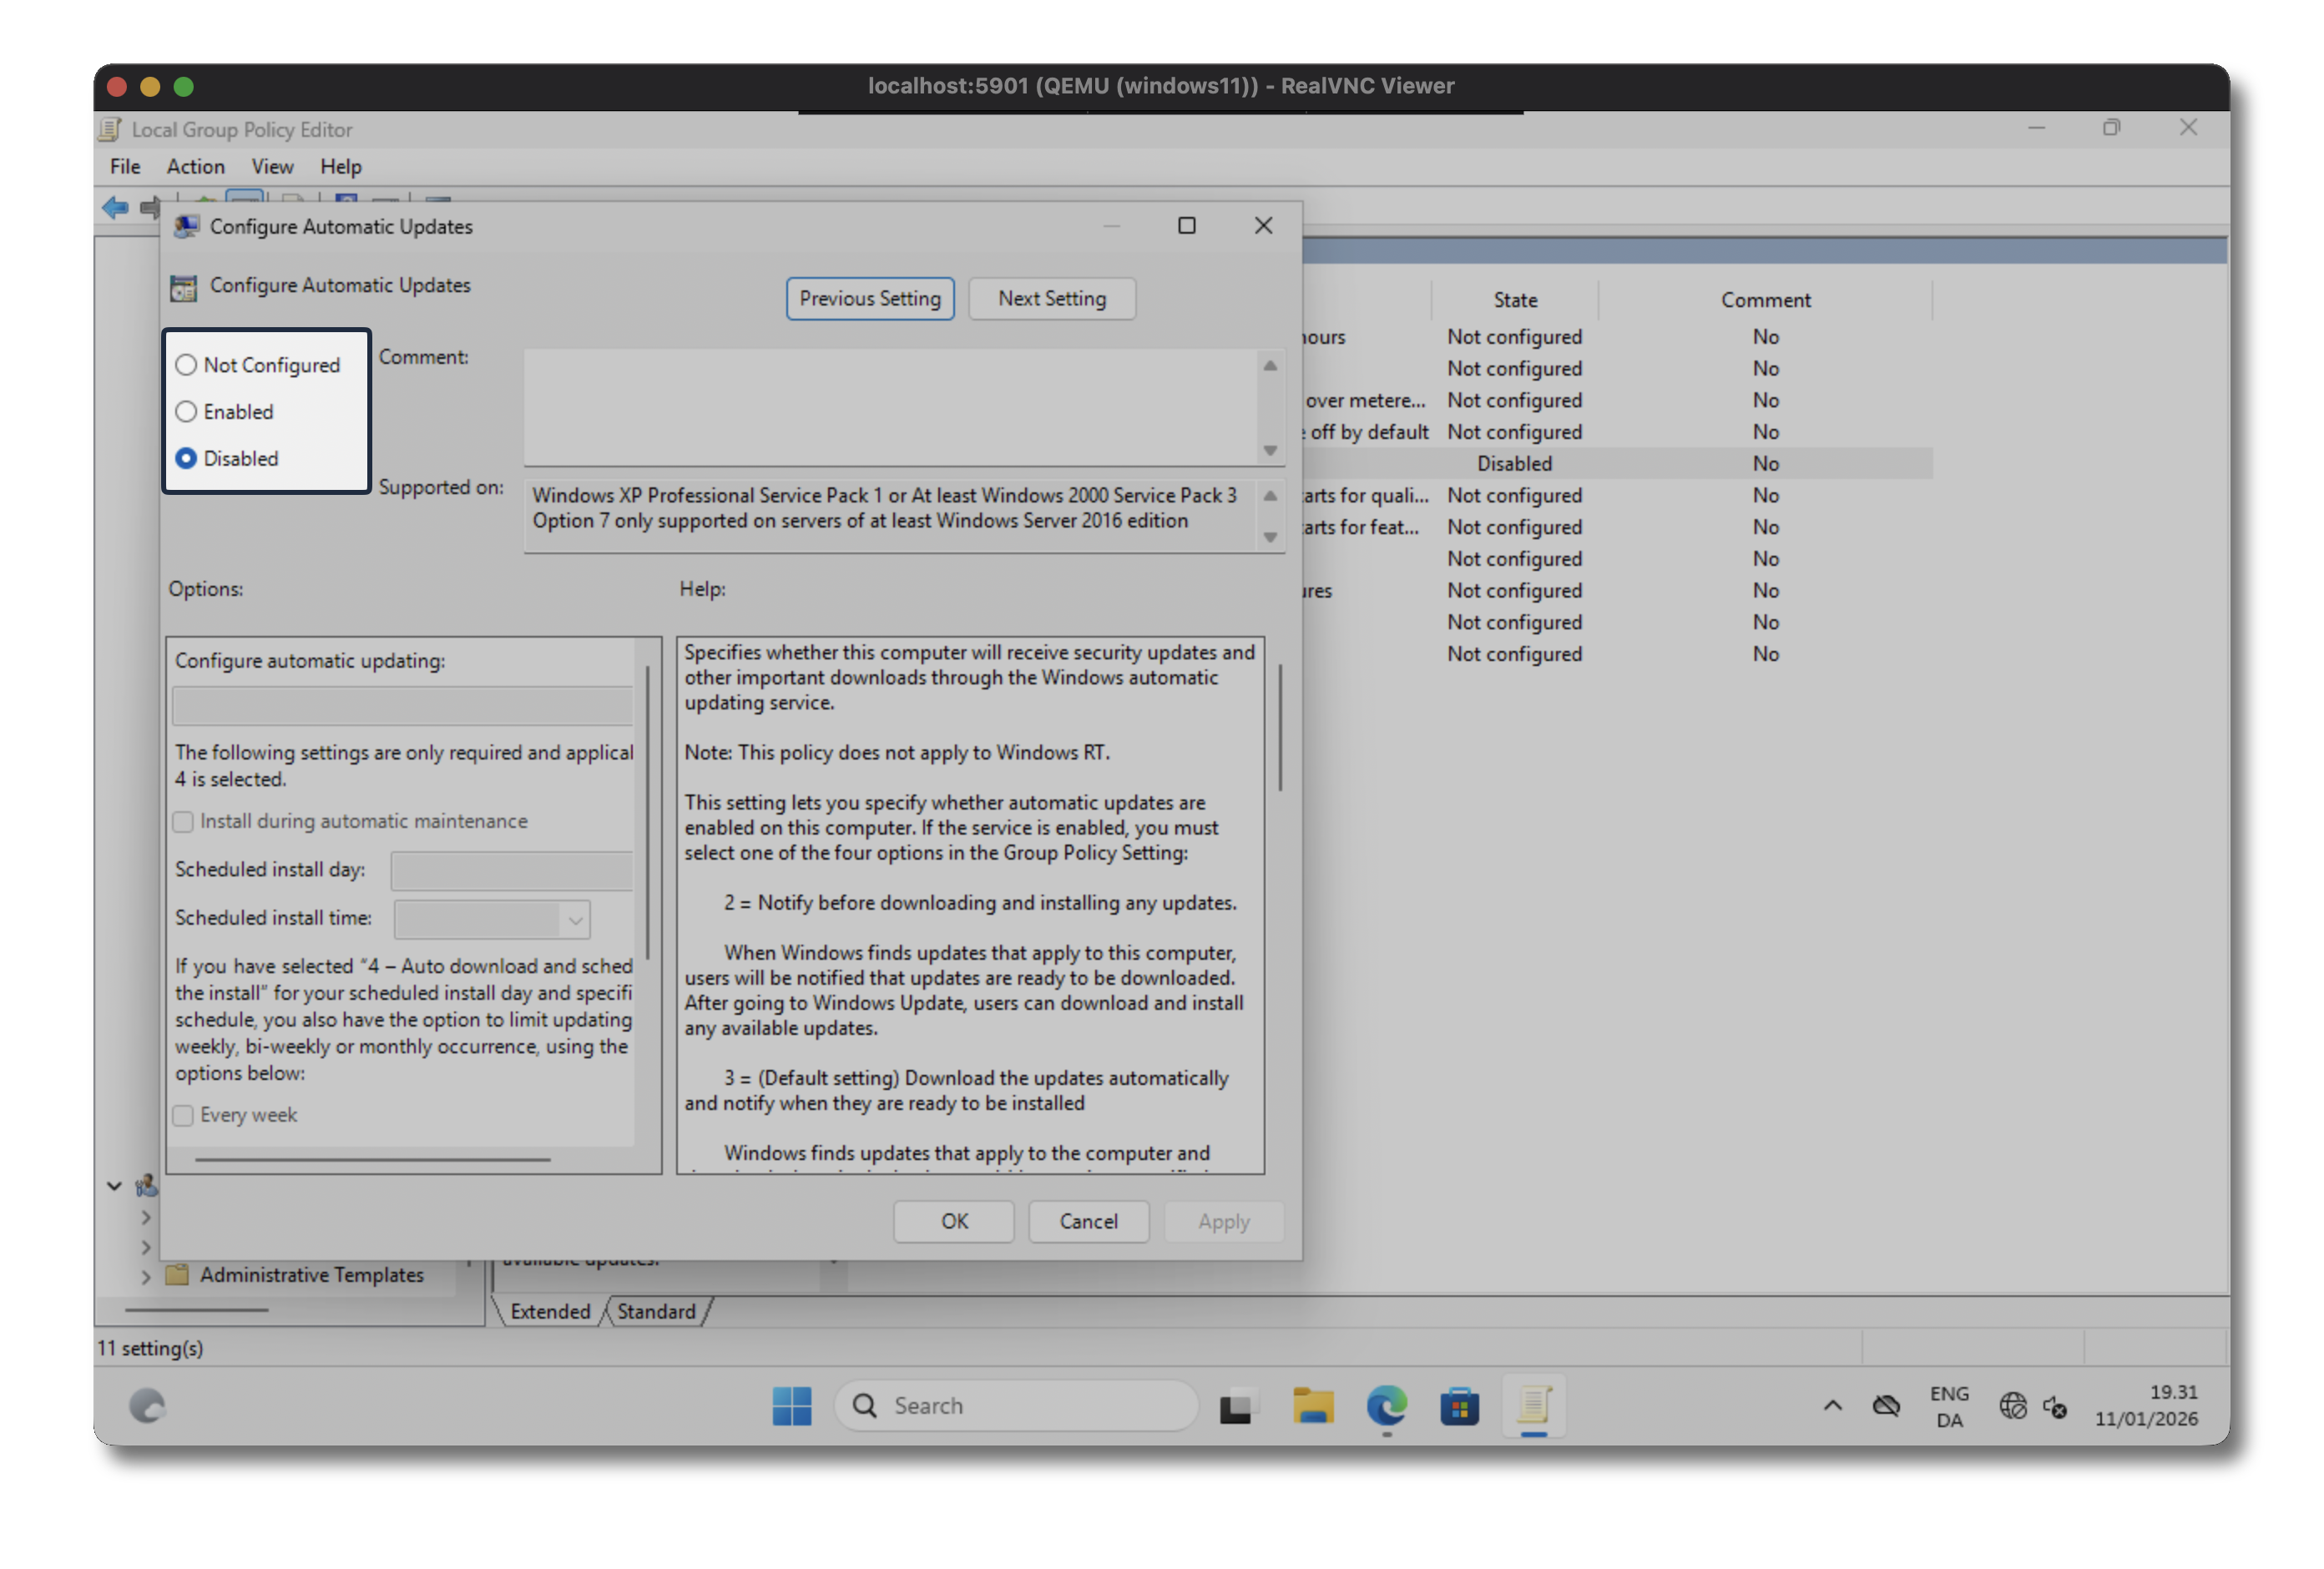
Power Settings
You may also want to modify the default Windows 11 Power Settings, as these will decrease your Windows performance as well as go into sleep mode after a short while, which isn’t suitable for a lab environment which can be running for several days, weeks or months.
Go to System > Power > Power Mode > Select Best Performance
Under the same menu, just below fold out Screen, sleep & hibernate timeouts and set all settings to Never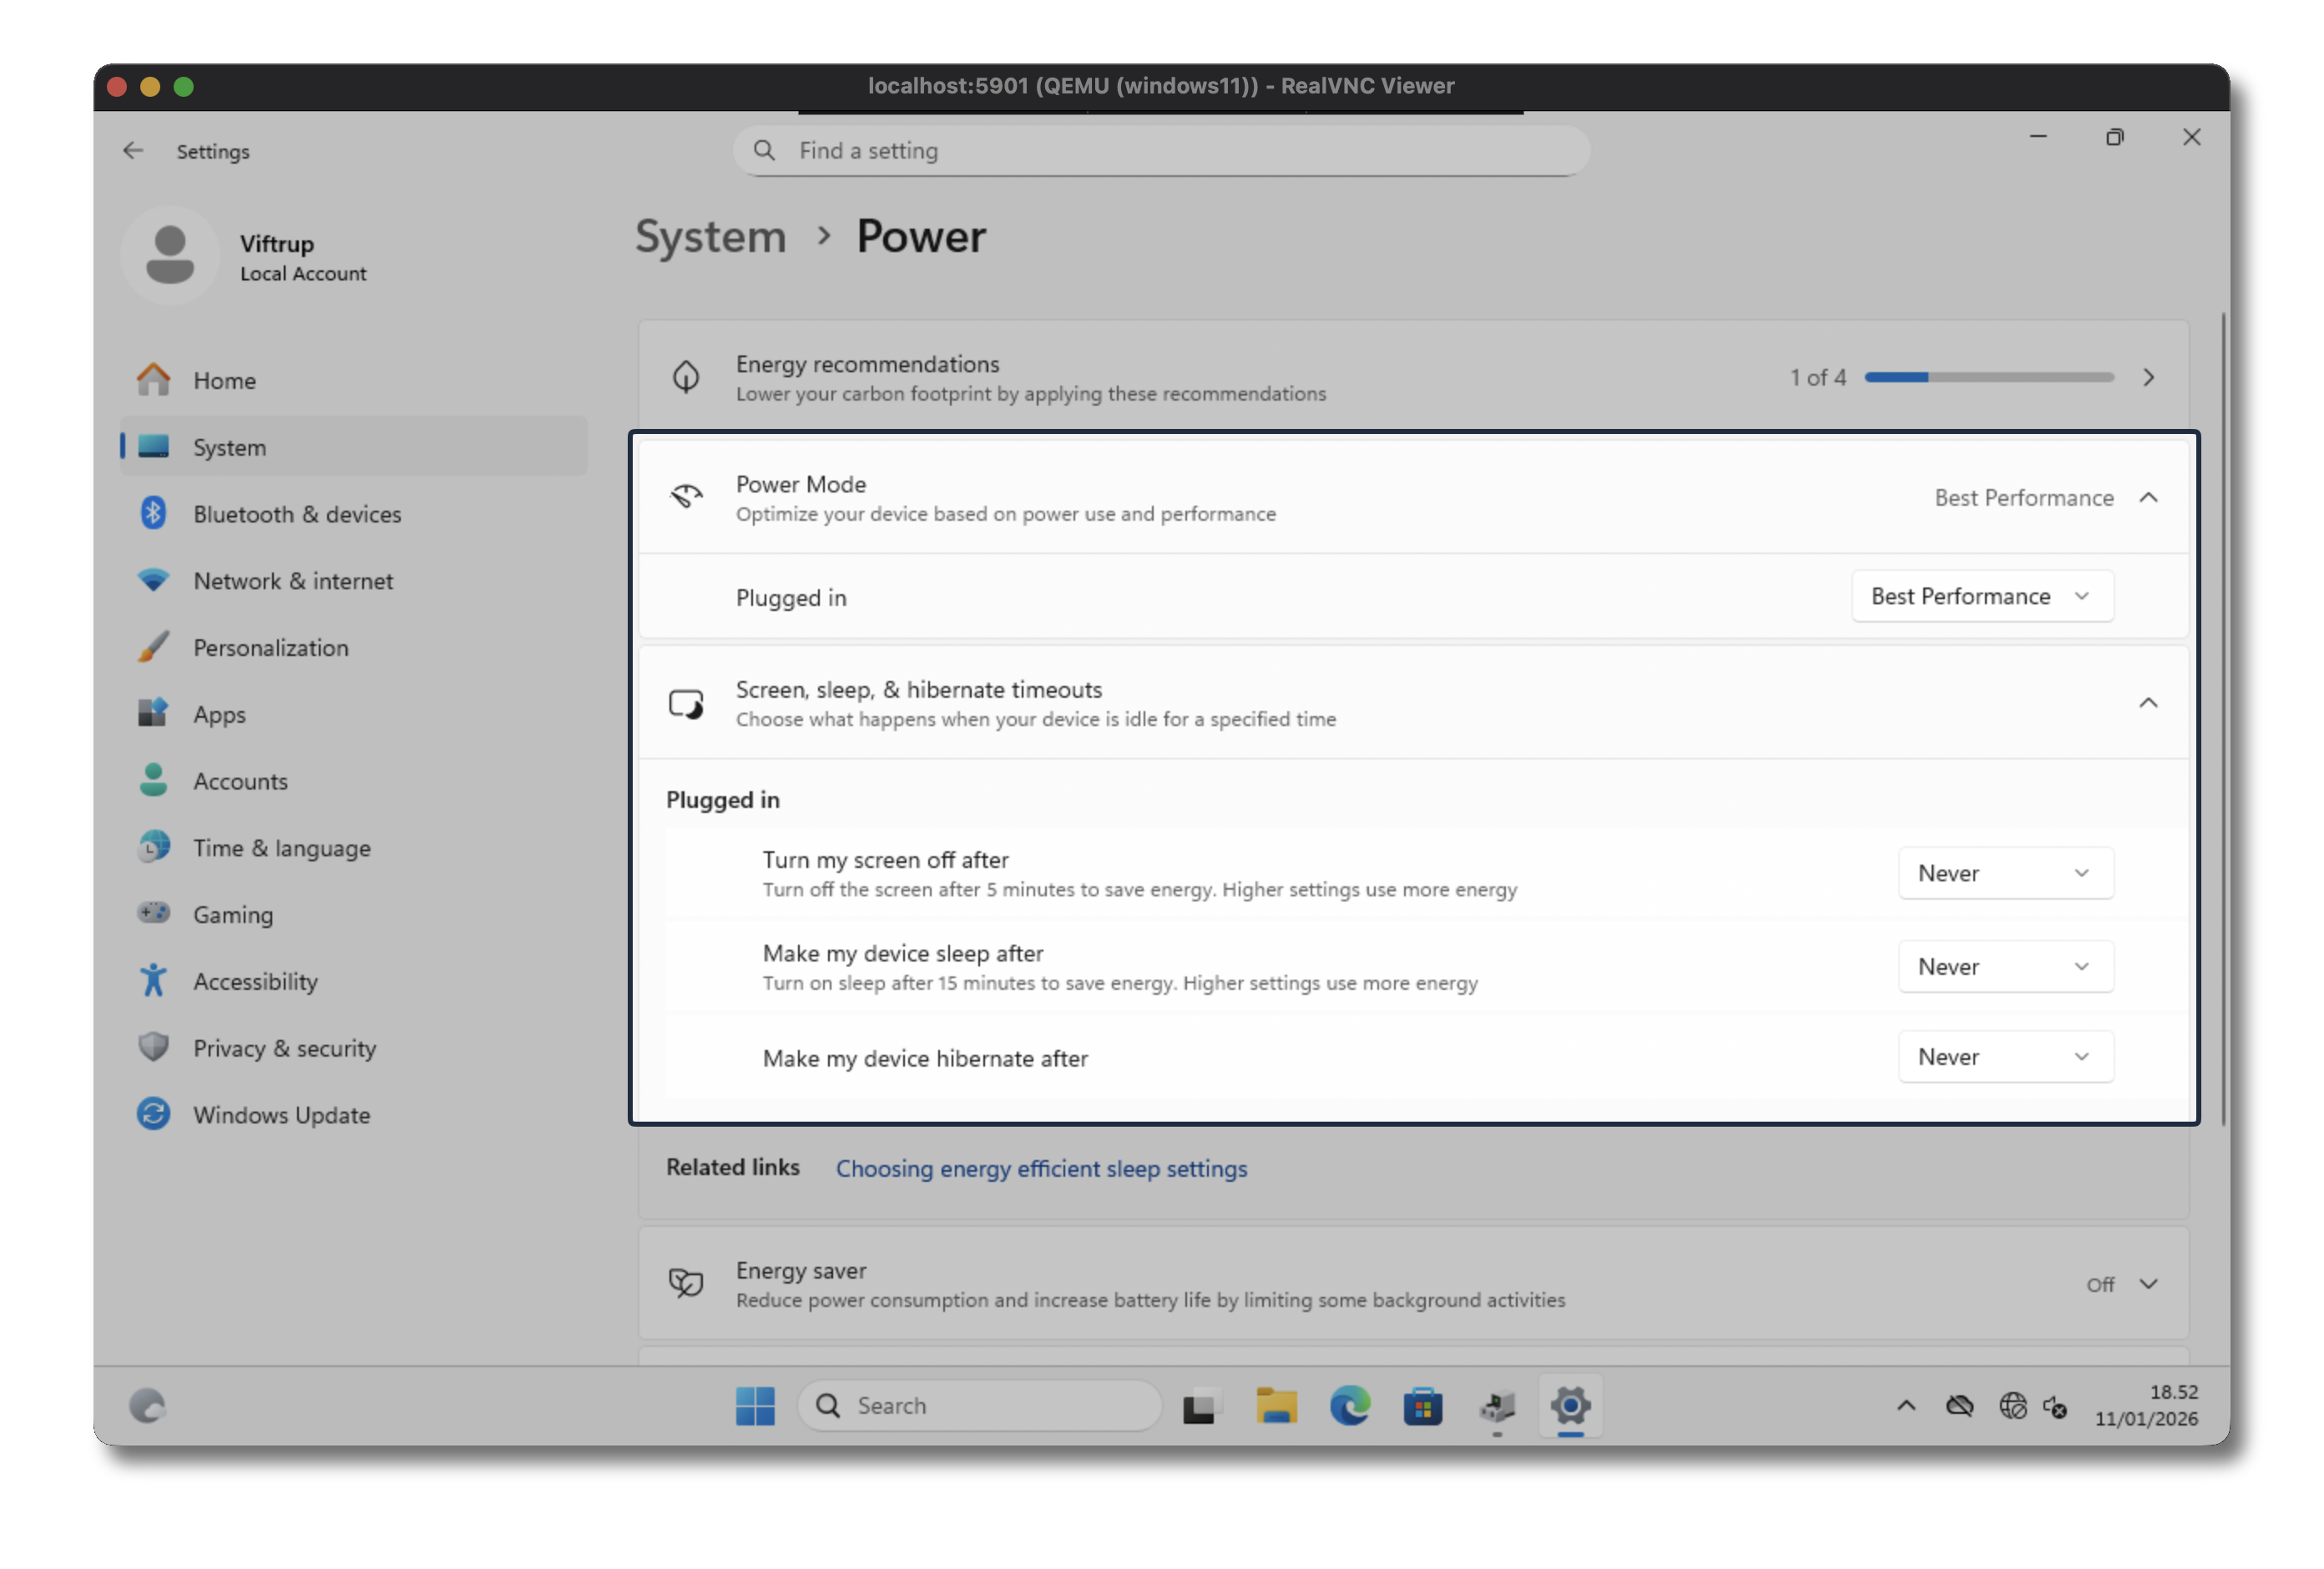
BONUS - Create a Signal for CML to Know The Node is Up and Ready
All credits goes to rschmied for this hint
By default the CML doesn’t know exactly when the machine has booted and is ready to be used. Within the CML UI once a node is active and ready, it’ll have a green circle present on the node.
But since CML doesn’t have any specific hooks to indicate and communicate this with the Windows 11 node, we’ll be creating a small cronjob to write READY to our serial console port COM1 of the Windows machine, which is then read by the CML controller. (We’ll define this within the node definition later on)
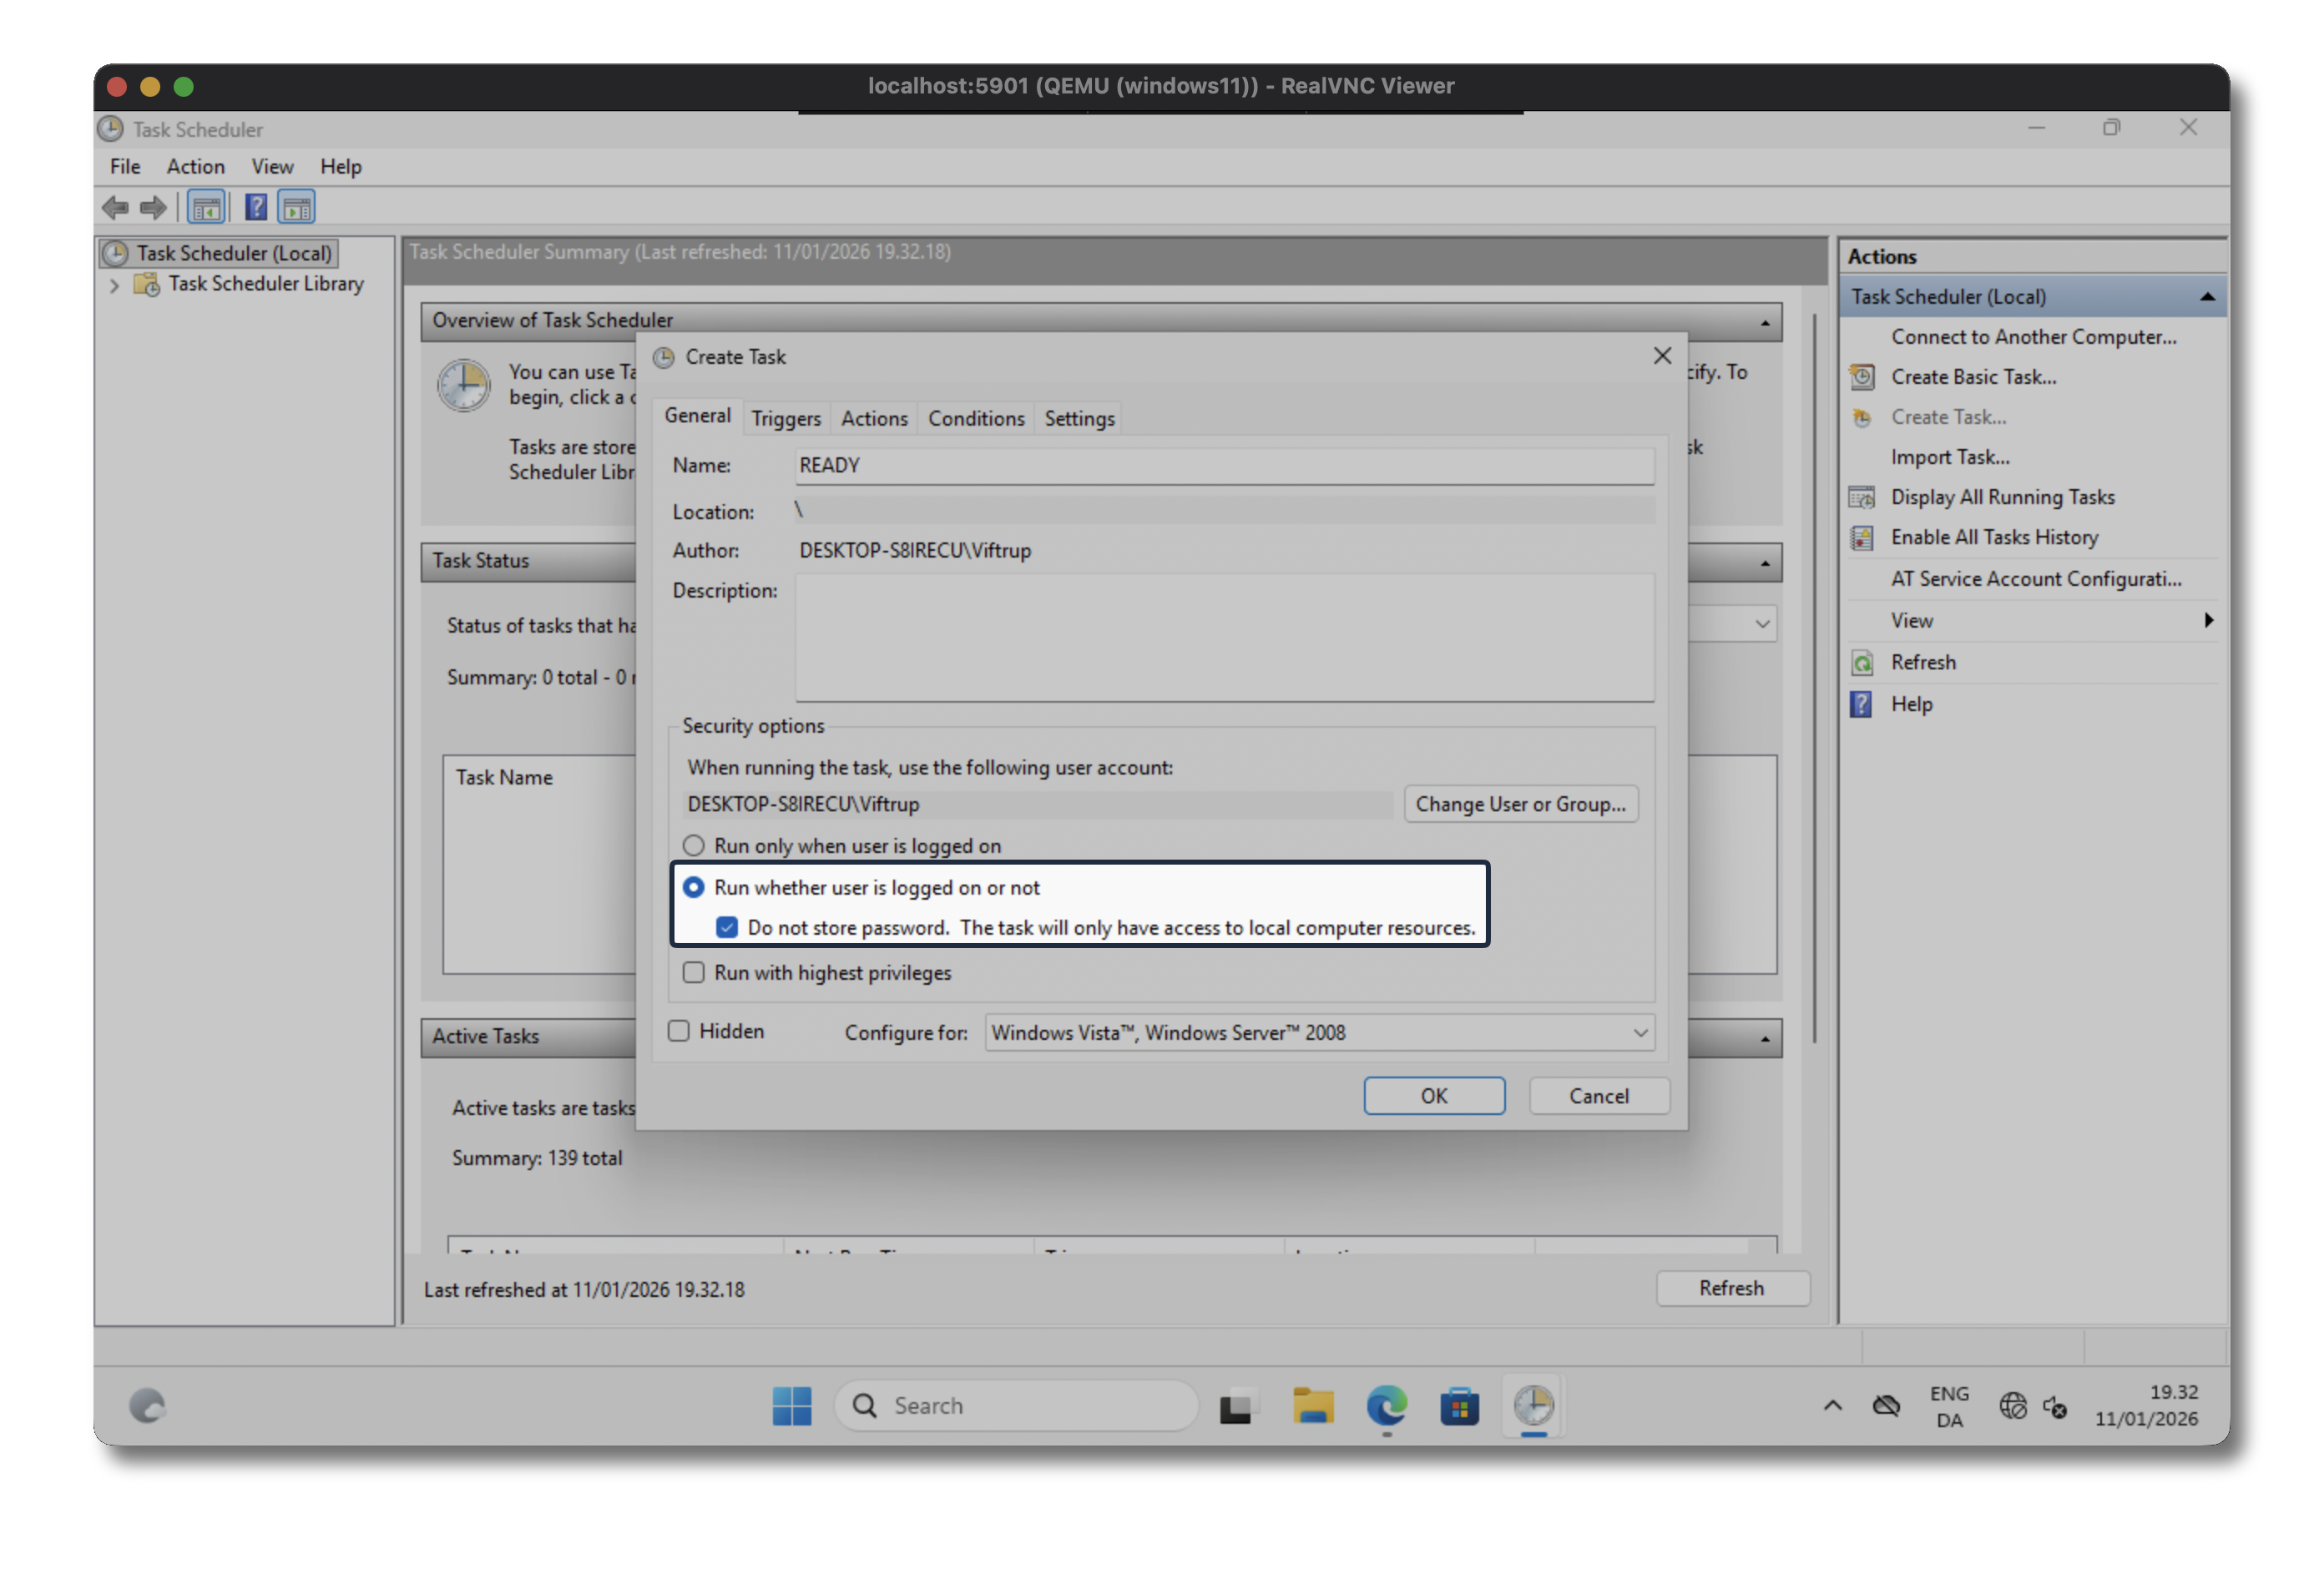
Start the Task Scheduler and create a new task on the far right side navigation pane. I’ve named it READY and be sure to select the cron should to Run whenever user is logged on or not otherwise the check will only succeed once you’ve logged into the Windows machine.
Next navigate to the Triggers tab and create a new trigger for our job.
At the top in the dropdown select At Startup so the job is run everytime the system is starting up.
At the Advanced Setting section tick the Delay task for radiobox and specify 30 seconds - you can tinker with the delay duration, I’ve chosen 30 seconds just to be sure, lower value should also work.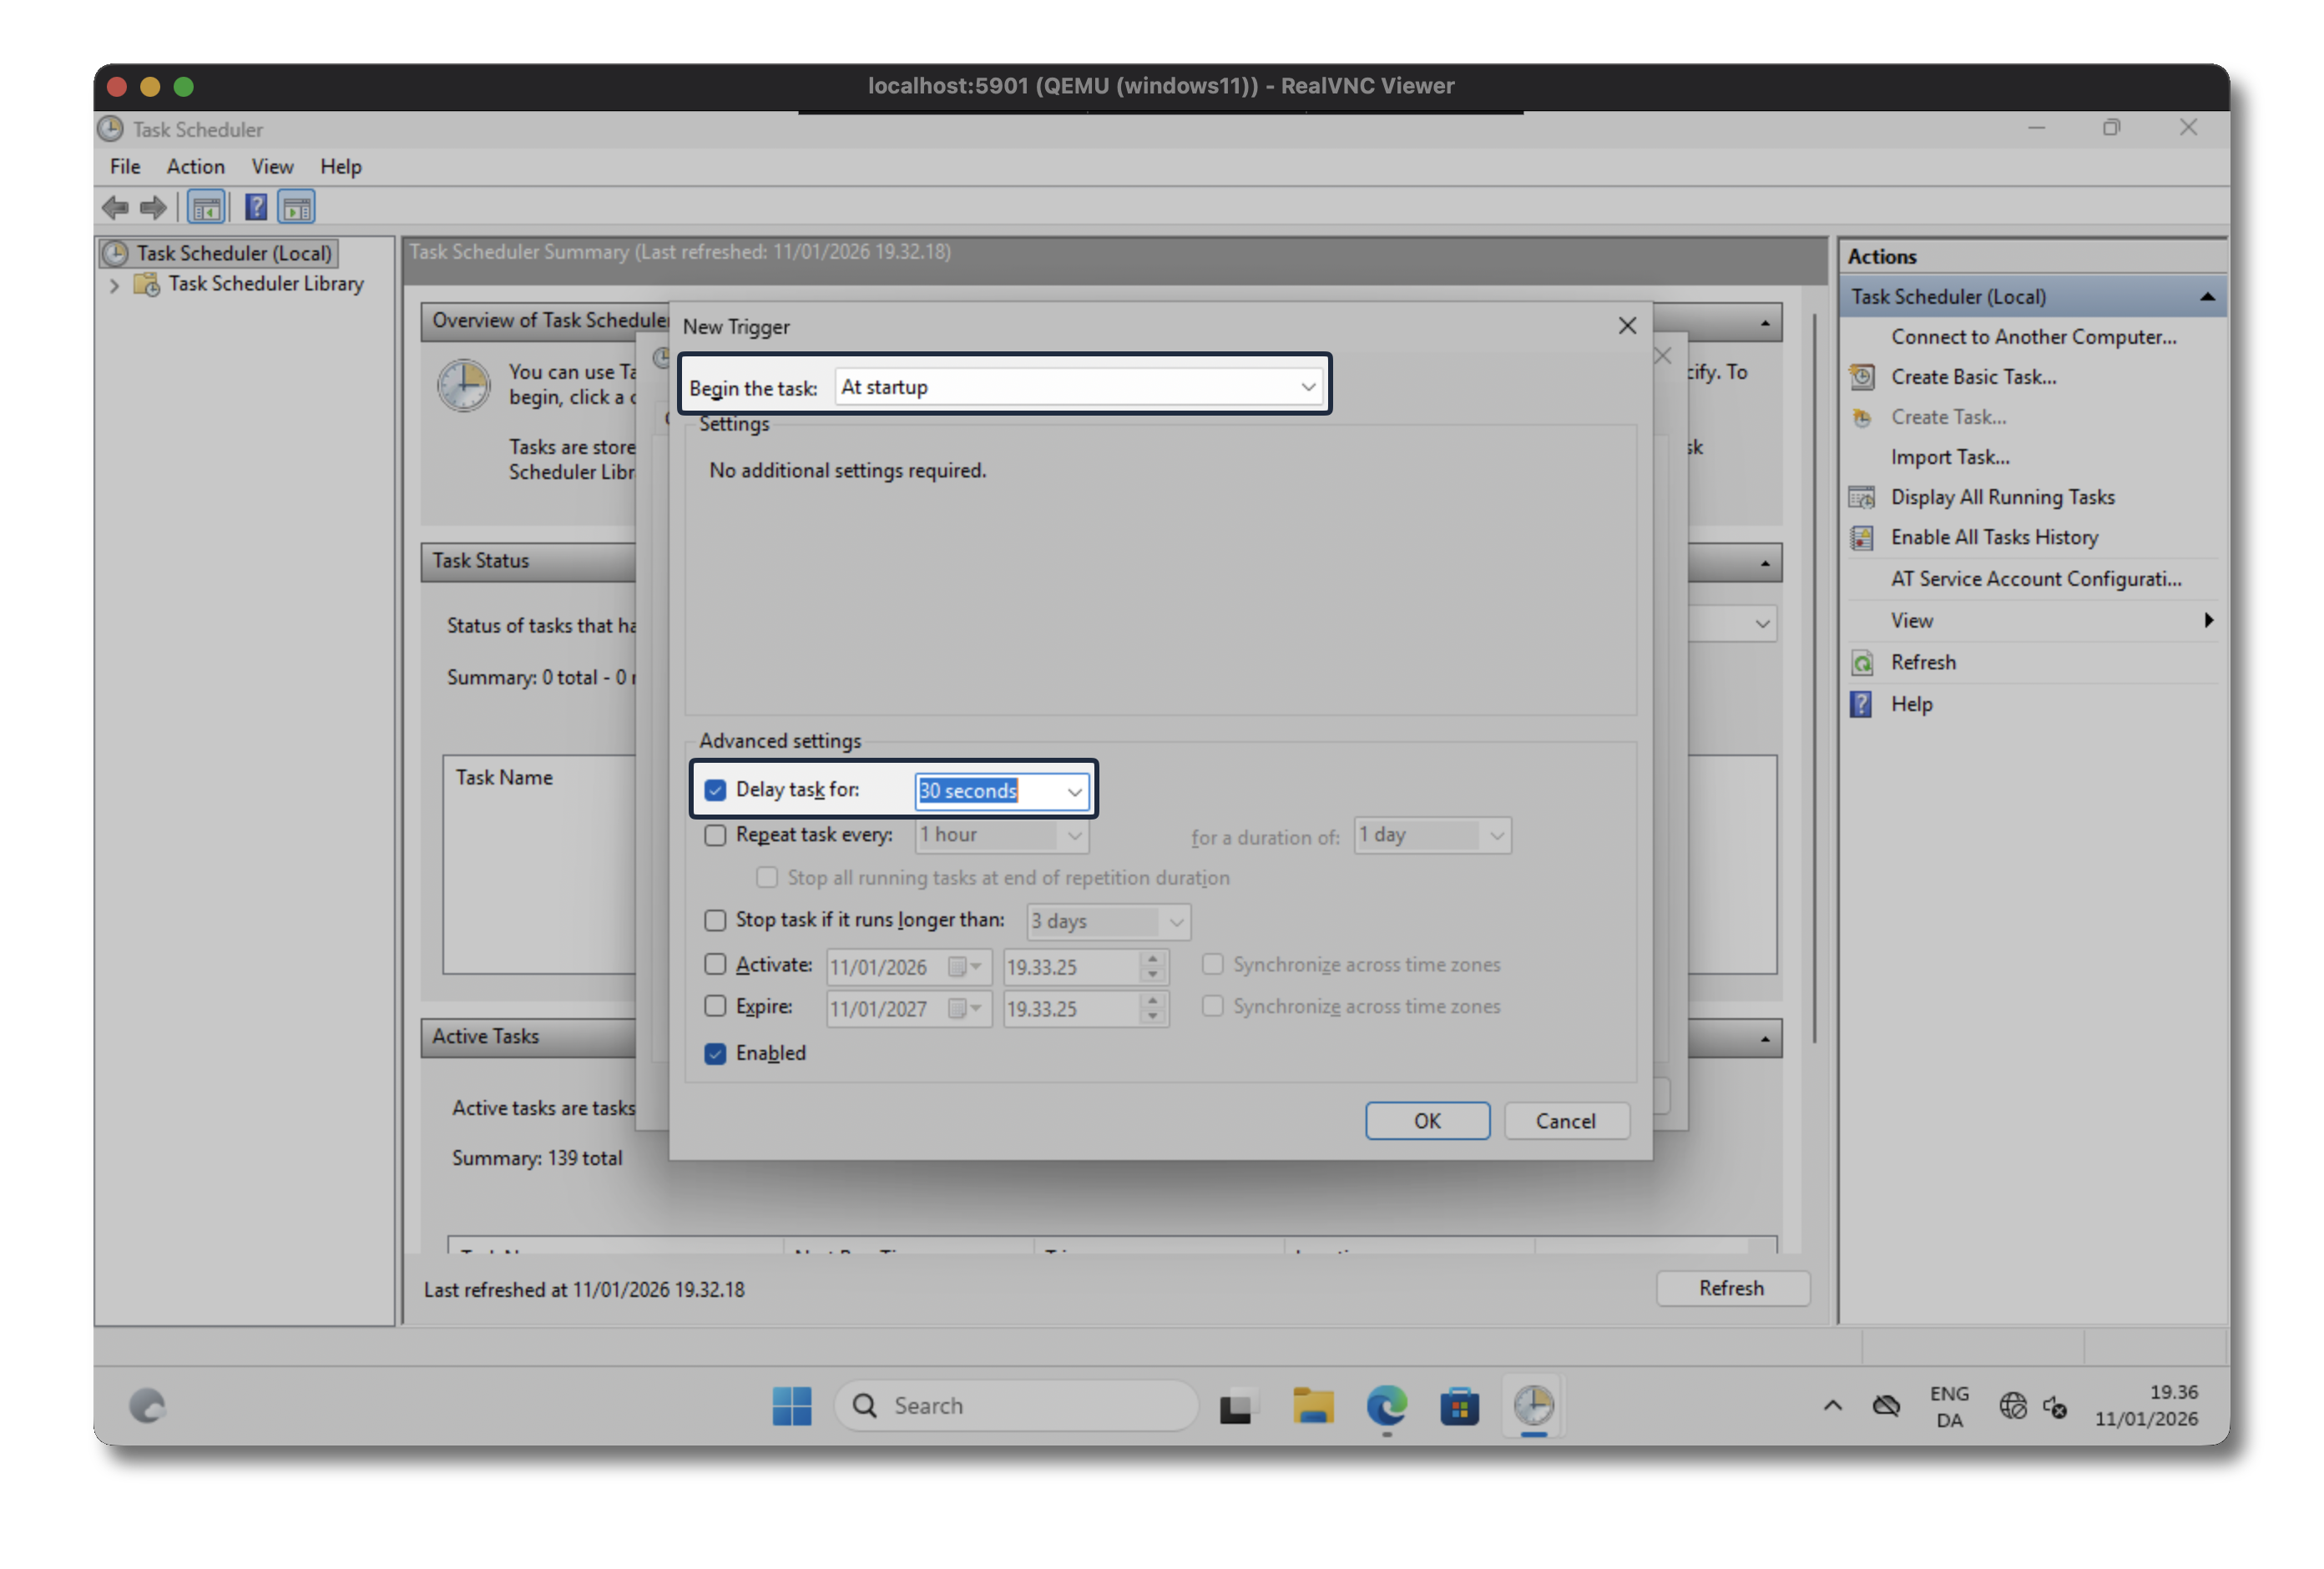
The last thing we need is to define an actual action to be executed. As mentioned earlier, we want to write a message to our serial console aka COM1 port.
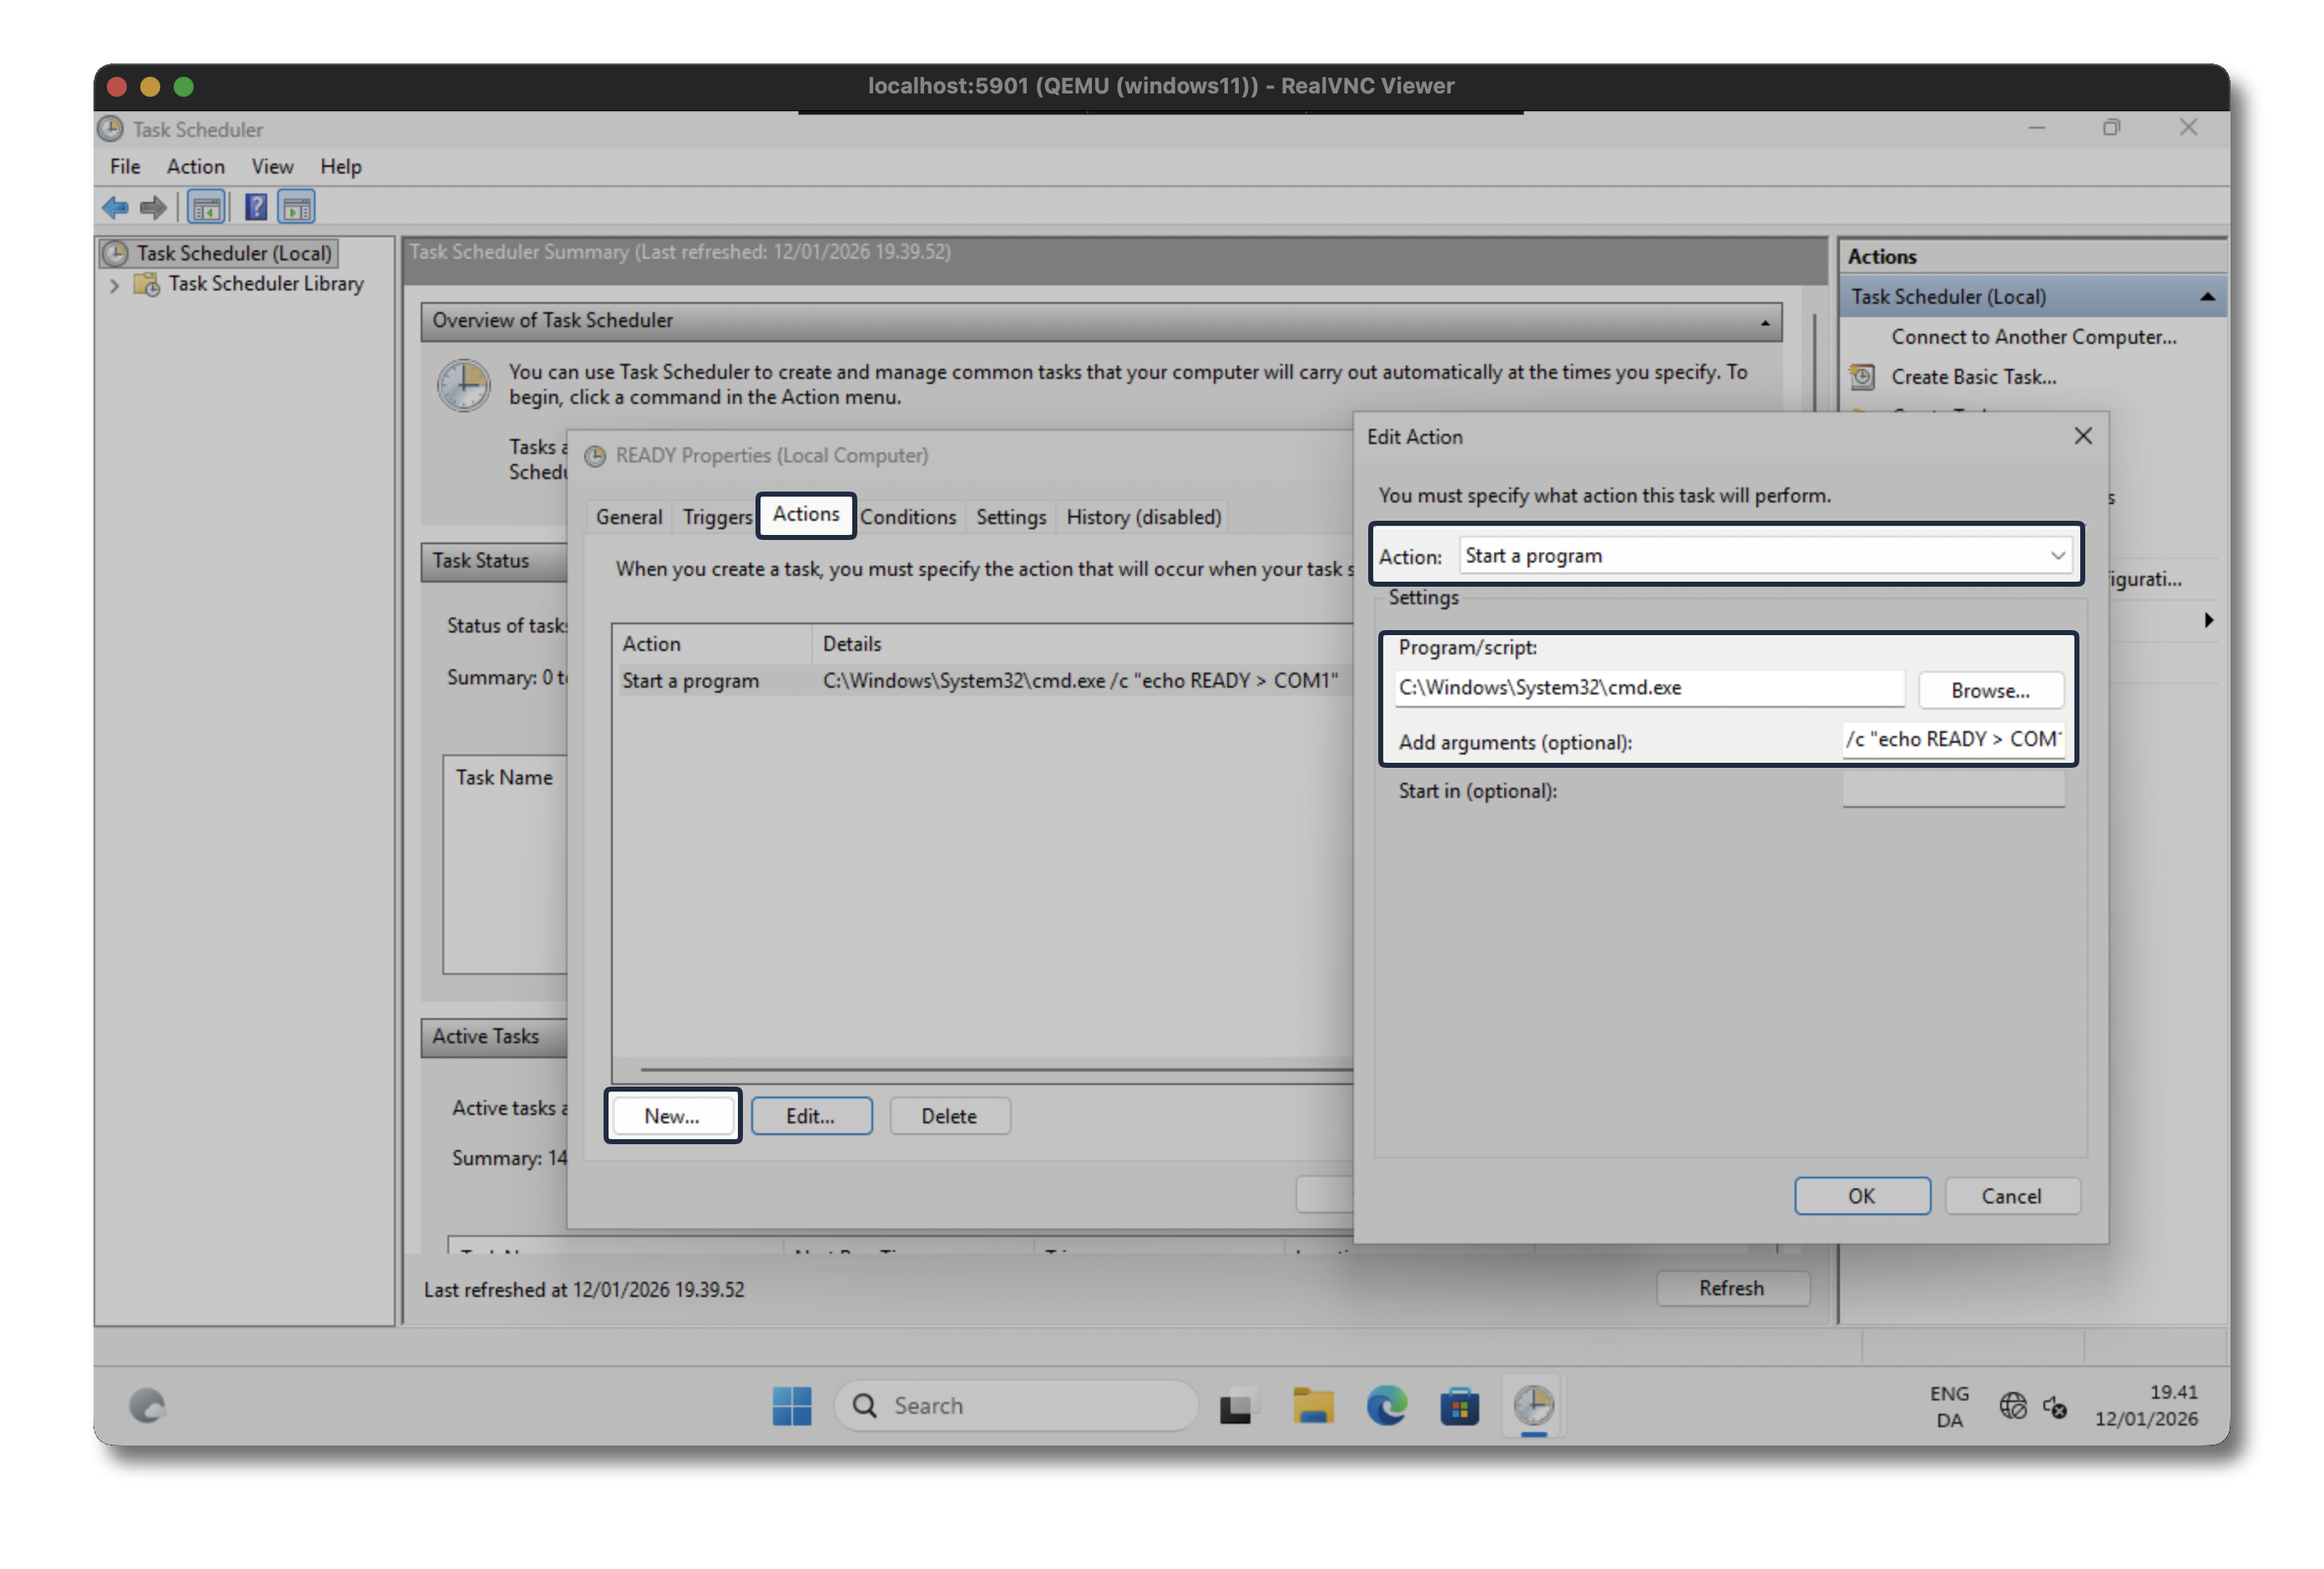
Make sure the action is set to Start a program, when either use the ‘Browse’ function to find cmd.exe or use the path below
C:\Windows\System32\cmd.exe
In the Add arguments (optional) put the following
/c "echo READY > COM1"
Import the Windows 11 QCOW2 into CML
Now we’re just getting started with the interesting and funny part - implementing our image into CML and see it running, and to be used in our lab environment.
First we’ll either move or copy our QCOW image we just created (I prefer to copy, in case I want to make changes to my golden image afterwards), and then we need to change the ownership on the file
sudo copy win11.qcow2 /var/local/virl2/dropfolder
sudo chown virl2:www-data /var/local/virl2/dropfolder/win11.qcow2
Create Node Definition
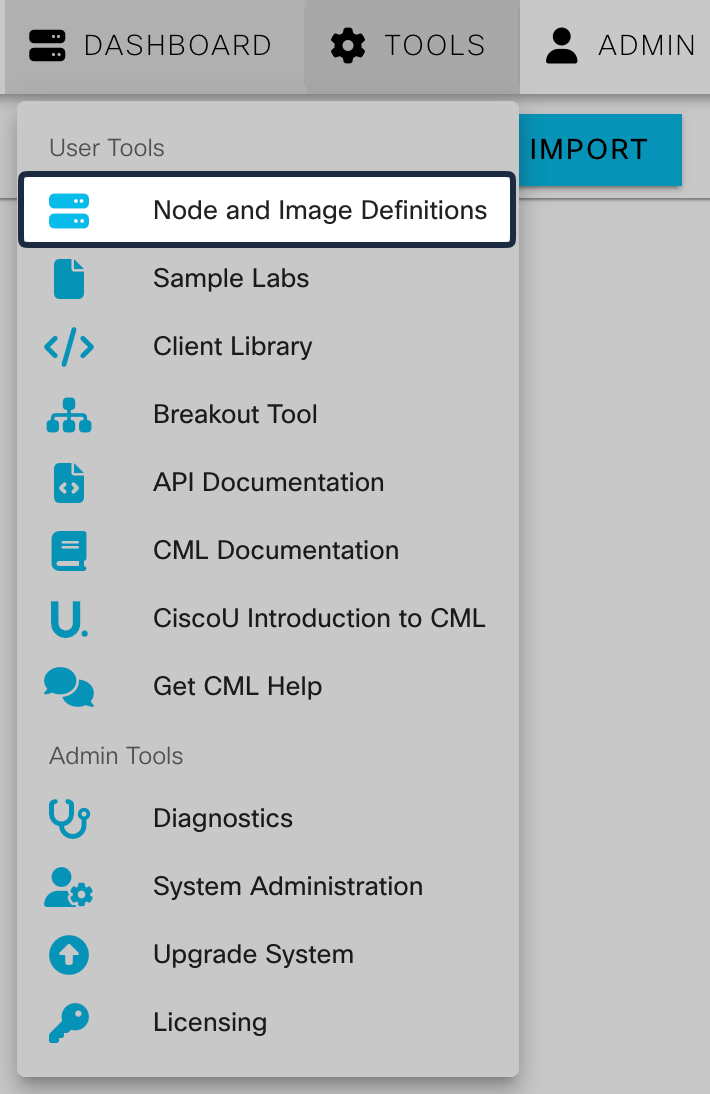
Log in to the CML web server and navigate to Tools > Node and Image Definitions > Import
Offically the Cisco DevNet CML repo is providing a definition for Windows 11, but this needs some minor tweaks and modification to match our setup.
I’ve created and uploaded a revised vision for you to download and import which will work out-of-the-box without any modifications. (Go to the Getting Started section if you haven’t downloaded this yet)

Create Image Definition
Followed by the Node definition we need to create the image definition as well, this is pretty straight forward.
- ID: win11
- Label: win11
- Node Definition: Windows 11
- Disk Image: win11.qcow2
Nothing else needs to be adjusted in this section.
Add Node to lab
Simply select to add a new node and choose the new Windows 11 node option, and connect it to your environment.

You don’t have to worry about serial numbers, MAC overlaps or device specific things we didn’t stripe initially, CML and QEMU is taking care of this behind the scenes - you can have multiple Windows 11 nodes running without interference, on that part.
Troubleshooting
This section covers some of the issues I encountered throughout the process and how I managed to overcome them.
Check if your problem might be described here before giving up.
Failed to upload file(s) to /home/admin
If you’re stuck at step transfering the necessary files to CML when you upload the 3 files to the CML Controller, you’re most likely encountering a problem with insufficient disk space available during the transfer.
Verify if this is the case
df -lh
This returns a lot of different data about disk and its partitions, the one you should focus on would be the following
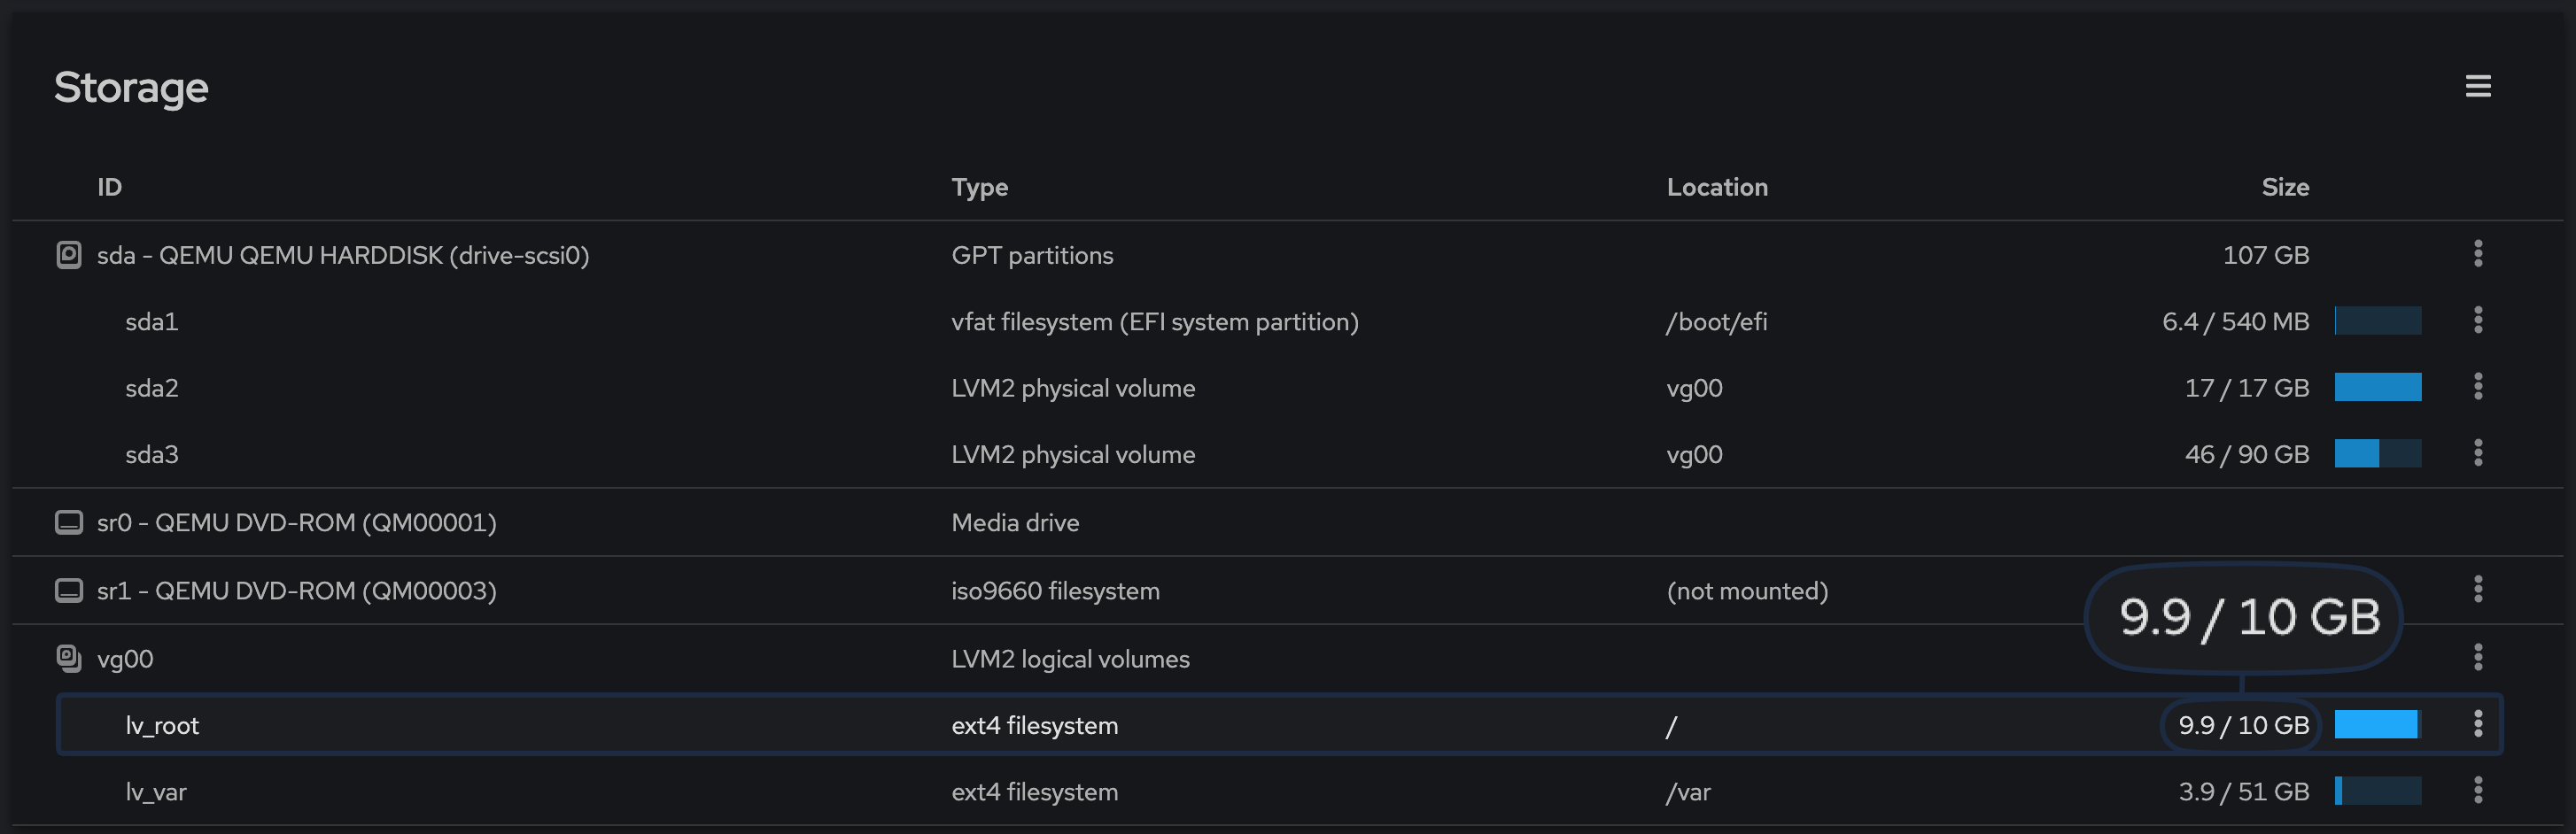
Filesystem                Size  Used Avail Use% Mounted on
/dev/mapper/vg00-lv_root  9.8G  9.3G     0 100% /
If the available disk space for the ‘/’ mount is 0 or the use procentage is at 100% as stated above, you’ve maxed out the partition at which the system runs on - including the home admin directory.
You’ll need to increase the disk size specifically on the vg00-lv_root partition within the Cockpit administration panel.
(Given that you’ve also made sure to add an addtional disk to your CML VM - I’ll not cover how you add an additional disk within your hypervisor in this article)
If you haven’t accessed the CML Cockpit before, you need to navigate to the port 9090 if your CML host, and then select Storage in the left pane.
https://IP-or-Hostname:9090
Adding additional disk to CML
Once you’ve added an additional disk to your CML machine you can when add a physical volume as shown below. (Your virtual disk = physical volume in Cockpit)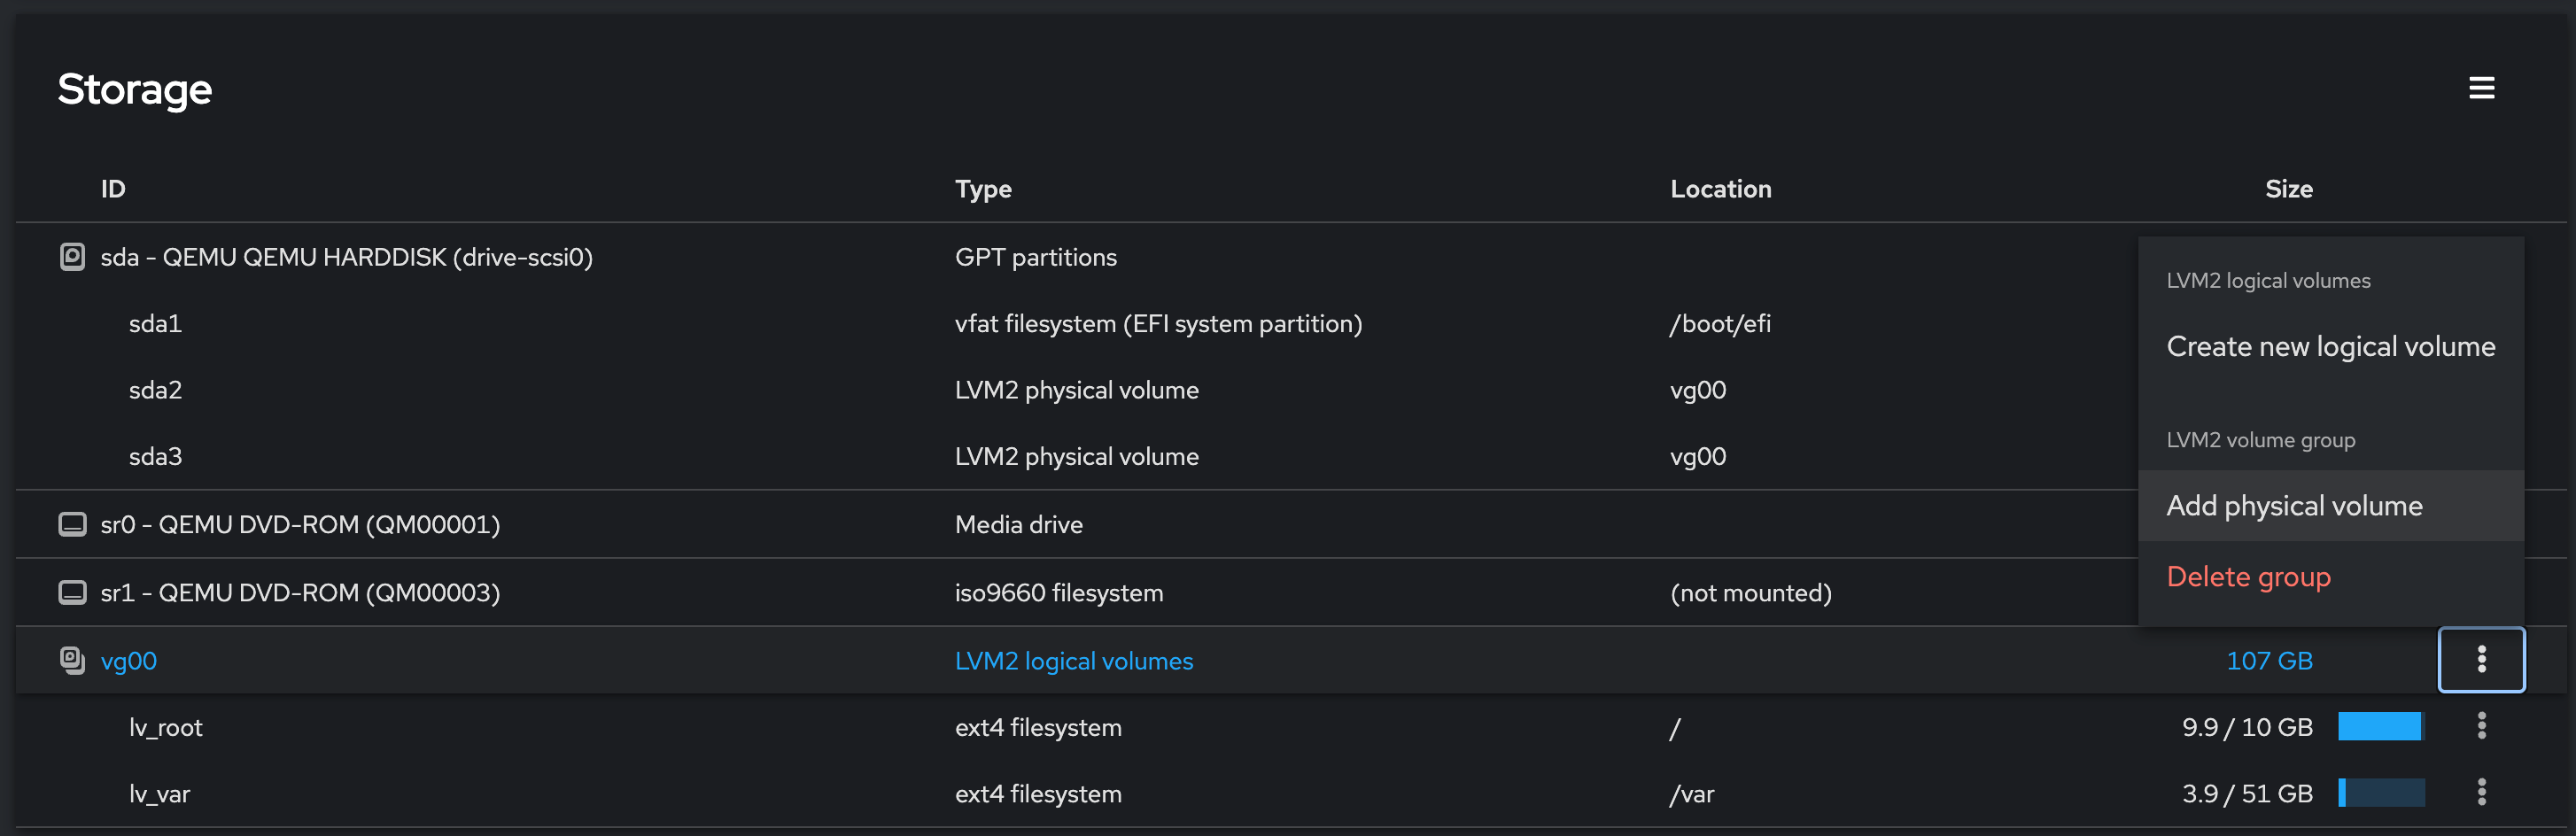
You should then be able to select at least one disk to be initialised and used as a “Physical Volume” within Cockpit.
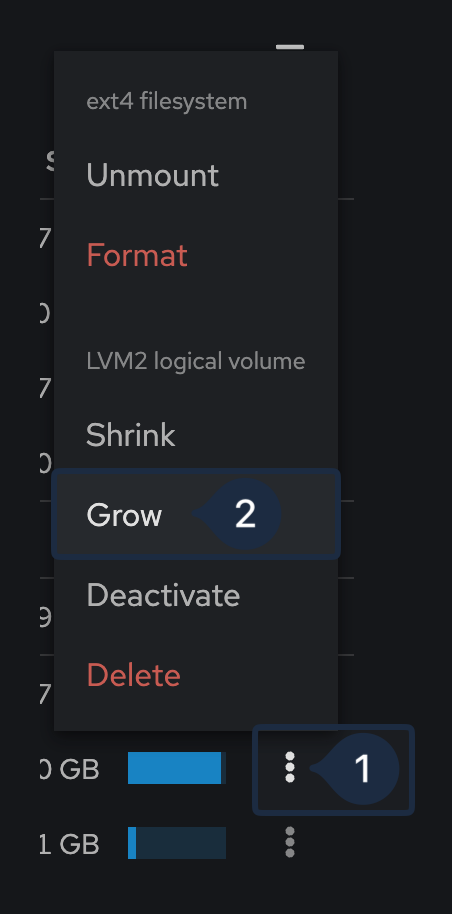
After the disk has been added within Cockpit you’ll need to extend the previously mentioned partition in order to increase the disk space on our mounted ‘/’ partition. At the far button section there’s a vg00 section and the top entry should be the lv_root which the smart reader will also notice was present in our previous commands within the SSH session.
Pressing the three dots on the far right, gives us the option to Grow (Grow, increase, extend - many names for the same thing), depending on your added disk and needs you specify how amount of that disk you want to allocate to this partition.

After this return to your SSH session and re-execute the command to show volumes and partitions, to verify the lv_root aka the ‘/’ mount has sufficient free space.
Credits
Huge credits and kudos to Ralph Schmieder for making this possible by sharing his experience and baseline script on how to make this a reality.